Importing Participant
Importing participants in Enterprise Archive allows you to add custodians to a case, perform searches that include participants from the Archive Management UI, and also allows you to add participants in a Conduct Intel queue. Enterprise Archive allows the user to import participants as a .csv file. The section below explains how to configure the CSV file.
Note
Importing participants will create new entries for new participants or update existing participant information. If participants or groups are not included in the CSV file, they will not be deleted from the system.
Example
In the following image, a participant is imported as a part of Group1, Group2, and Group3.
Later, the same participant is imported as a part of Group1 and Group2.
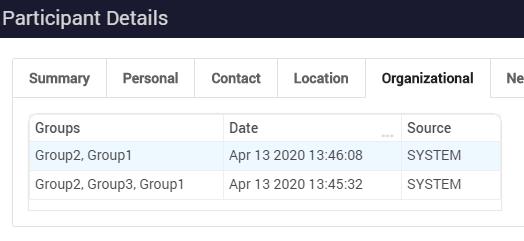
In this case, Group3 will not be deleted, but the participant info will be updated as part of Group1 and Group2.
Enterprise Archive has a defined .CSV (Comma Separated Values) file format for importing participants. Vantage and Socialite administrators must ensure to create the .CSV file for participants in the Enterprise Archive defined format, and then export the participant information from their database or LDAP into this .CSV file.
Enterprise Archive Administrators must import these .CSV files into Enterprise Archive to generate participant information. For information on the .CSV file format, see Creating the .CSV Format file for Importing Participants.
Importing participants involves the following tasks:
Creating the .CSV Format file for Importing Participants
To import the participant details, you must first export your participant details from your database or LDAP into a .CSV format file.
The CSV importer imports the participant information to an identity management store. The .CSV importer supports the following information for participants:
Participant Attributes: Fields 1 through 21 in the CSV file define the user attributes.
Participant Groups: Field number 22 defines the groups to which the participant belongs.
Network Attributes: Field number 23 defines the network information for the participant.
User Secondary Addresses: Field number 24 defines the secondary address of the participant.
Each line in the .CSV file is considered a unique record for a participant. Each participant record must have exactly 24 comma separated values.
Important
The mandatory fields to import a .CSV file are #IdentityId and UserType.
You must ensure that you define the .CSV file in the format as defined in the following table:
|
Field Number |
Fields |
Description |
Example |
|
1 |
#IdentityId |
A unique identity of the participant. This field uses the participant's email ID as the unique ID. This is a mandatory field. |
james.gilchrist@smarsh.com |
|
2 |
UserType |
Defines if the participant is Internal or Federated. This is a mandatory field. |
Internal or Federated |
|
3 |
FirstName |
The first name of the participant. |
James |
|
4 |
MiddleName |
The middle name of the participant. |
W |
|
5 |
LastName |
The last name of the participant. |
Gilchrist |
|
6 |
Initials |
The initials of the participant. |
JG |
|
7 |
OfficeEmail |
The official email ID of the participant. |
james.gilchrist@smarsh.com |
|
8 |
EmployeeId |
The employee ID of the participant. |
100360 |
|
9 |
JobTitle |
The job title of the participant. |
System Analyst |
|
10 |
Department |
The department in which the participant works. |
Engineering |
|
11 |
Division |
The division to which the participant belongs. |
Technical |
|
12 |
Company |
The name of the company in which the participant is employed. |
Smarsh Inc. |
|
13 |
Building |
The building in which the participant works. |
Building B |
|
14 |
City |
The city in which the participant works. |
Redwood |
|
15 |
State |
The state to which the City belongs. |
CA |
|
16 |
Country |
The country to which the State belongs. |
USA |
|
17 |
OfficePhone |
The office phone number of the participant. |
6506316300 |
|
18 |
SecondaryOfficePhone |
Alternate office phone number of the participant. |
6505982820 |
|
19 |
MobilePhone |
The mobile phone number of the participant. |
9999999999 |
|
20 |
HomePhone |
The home phone number of the participant. |
6506316300 |
|
21 |
OfficeOtherPhone |
Any other official phone number of the participant. |
6505982820 |
|
22 |
Groups |
The group(s) to which the participant belongs. Multiple groups can be assigned to an employee, separated by commas and encapsulated within double quotes. However ensure that there are no spaces while specifying group names. |
|
|
23 |
Networks |
The networks on which the participant communicates. There can be more than one networks defined. The information for a single network includes the following four attributes:
Each information needs to be separated by a comma, and the Screen name must be provided in double quotes. Multiple network values should be encapsulated in double-quotes. |
|
|
24 |
Secondary Address |
The secondary address of the participant. This is an optional field. |
1400 Seaport Blvd. Building B, Third Floor, Redwood City, CA 94063 |
|
25 |
Preservation Policy DEPRECATED FOR NEW USERS |
Enables or disables preservation policy for the users data. To enable preservation policy for a user, enter yes in this field. Else enter no or leave the field blank. |
yes |
|
The Preservation Policy field is deprecated. Use Custodian Hold to apply preservation policy for the users added using the CSV file. This deprecation applies only to new users who are onboarded to Enterprise Archive. Existing Enterprise Archive users can continue to use the Preservation Policy field while importing participants using the CSV file. |
|||
|
26 |
Custom Attributes
|
Custom Attributes field enables you to match Enterprise Archive Field Name to any additional attributes. The attribute must be specified only in JSON format. Single or multiple values can be added in Custom Attributes. Example Single Key Value attribute: {"NAM-Supervision-Group": "john", "CASE_Group":"smith"} Single Key Multi Value attribute: {"NAM-Supervision-Group": ["Sup_Group_1","Sup_Group_2","Sup_Group_3"], "CASE_Group": ["Case_group1","Case_Group2"]} For more information on viewing custom attributes, see Custom Attributes |
{"Labels": ["Label XYZ","Label ABC","Label MNO"], "CASE_Group": ["Case_group1","Case_Group2","Case_Group3"]} |
|
27 |
StartTime (Add this value only if the Historical Data Import feature is enabled.) |
The "Start Time" allows you to specify the validity period for each employee record for historical data import. For more information, see Enabling Historical Data Import. Historical Data Import feature is behind a feature flag. Contact Smarsh support to enable this feature. |
This column should be formatted as MM/DD/YYYY HH:MM:SS.SSS in UTC. For example, 12/31/2010 09:15:10.000 |
Sample .CSV files are available for your reference - Click to download Live or Historical CSV samples.
Importing the Participant Information Using .CSV files
To import participant information:
Select the Administration tab.
Click Import under the Participants category.
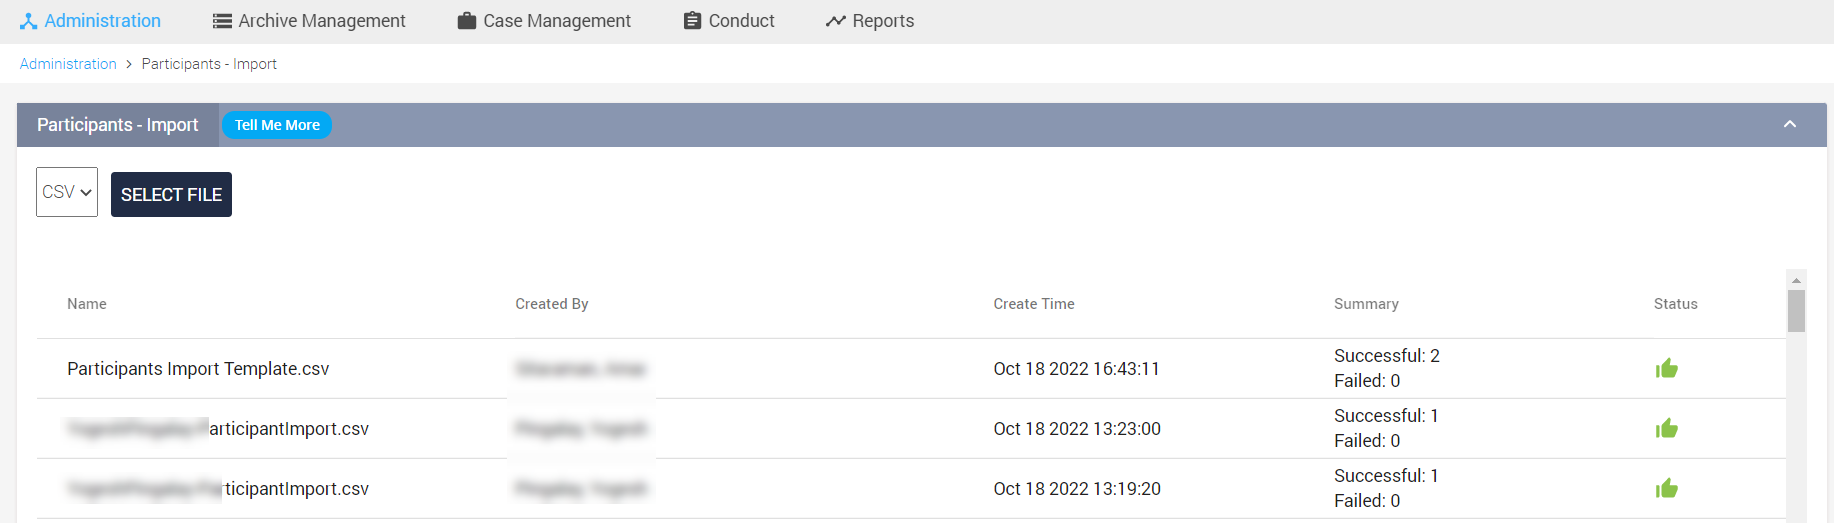
Click Select File, to import the participants information through a .CSV format file. The File Upload dialog appears.
Browse and then select the correct .CSV file for importing the participant information and then click Open from the File Upload window. The Import Participants page appears and the selected file name appears in the File text box.
Click Import. This completes the process to import the participant information to Enterprise Archive.
After importing the .CSV file a summary of the import displays in the lower panel. Enterprise Archive displays the following information for the participant import:Detail
Description
Name
The name of the .CSV file that is imported.
Created By
The name of the user who imported the .CSV file.
Create Time
The date and time when the .CSV file was imported.
Summary
Provides the following information:
Successful: Provides the number of participant details that were imported successfully.
Failed: Provides the number of participant details that were not imported. You can click (View) to see the reason for failure in importing the participants.
The Details pop-up displays only 200 failures. To view the complete failed summary report, click Download As CSV.
Status
Displays a green color thumbs up icon, indicating that the import process is completed.
To see the participant that were imported to Enterprise Archive, click View, under the Participants category, from the Administration workspace.