Performing Conduct Reviews
When a reviewer is added to a review level in a queue, and the queue is enabled, then that queue is listed in the My Review Queues for that reviewer. The My Review Queues page lists all the queues to which the reviewer is added. Each queue lists multiple conversations that are fetched by the configured policies, based on the selected participants. These conversations are available for reviewers to audit. The reviewer can also add newer conversations for review by using the search filters present in the Available Filters pane.
The following topics detail the procedures in performing Conduct Reviews:
Performing Conduct Review Workflow
The Conduct review workflow is explained in the following diagram.
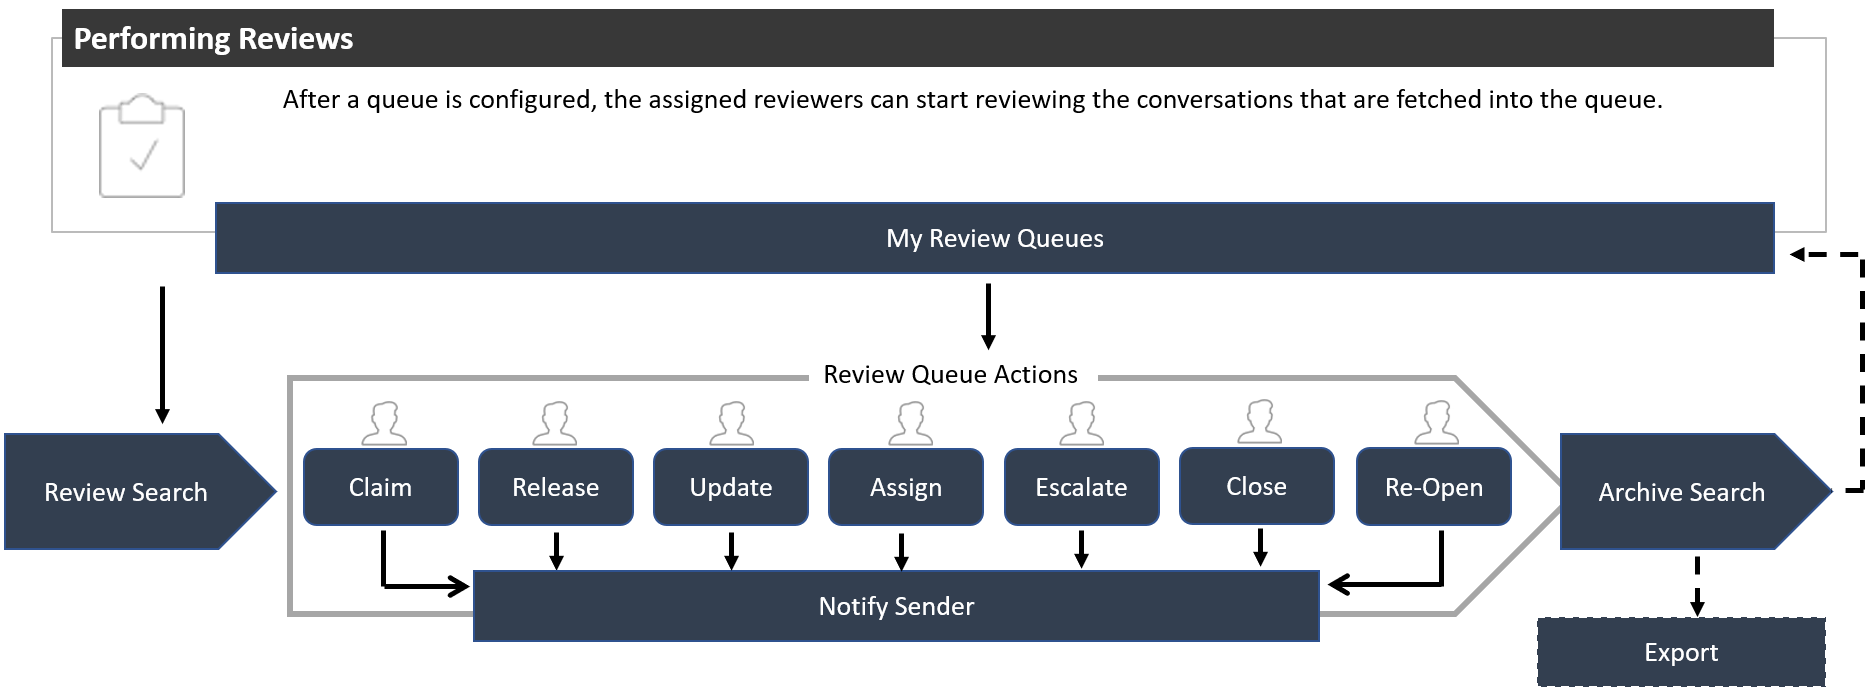
To perform a Conduct Review:
Select a conversation for review as explained in the Selecting a Conversation for Review topic.
Search for conversations from the Review search pane. Refer the Conduct Review Search section for more information on Review search options.
Perform any of the Conduct actions such as Claiming a Conversation, Releasing a Conversation, Updating a Conversation, Assigning a Conversation, Escalating a Conversation, Closing a Conversation, Re-opening a Closed Conversation, Track Action Status, and Exporting Search Results.
The user can also search for conversations from the archive during the review process and add them to the review queue. Use the Conduct Archive Search menu to add conversations from the archive for review. Refer the Conduct Archive Search topic for detailed information on archive search options. The available search options are:
Upload Policy - Allows you to upload a Lexicon JSON policy file. For more information on Lexicon Policies, see Configuring Conduct Policies section.
Search Criteria - Allows you to search for conversations using the search criteria provided in the Available Search Filters pane. Refer the Conduct Archive Search section for more information.
Export conversations from the Conduct Documents pane by selecting the Export action. For more information on Exporting conversations, refer the Exporting Search Results topic.
Access statistical data related to Conduct activities from the Dashboards menu. For more information on Conduct dashboards, refer the Conduct Dashboard topic.
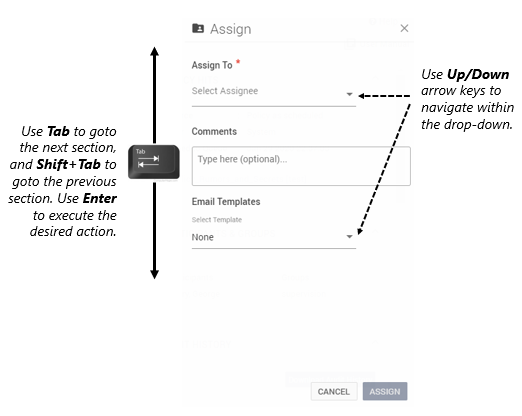
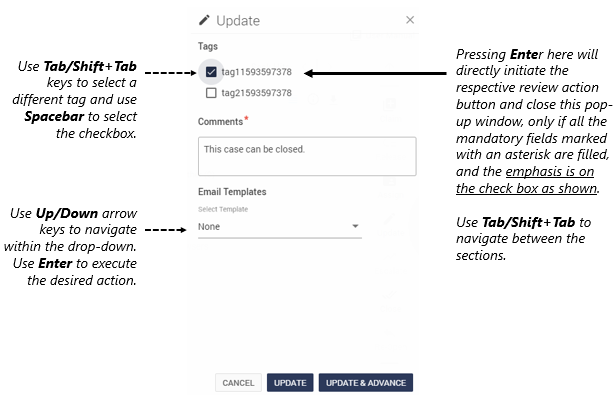
Using Keyboard Functionality for Review Actions
Reviewers can complete review actions using the keyboard as explained below for the respective use-cases. This will assist users who prefer using their keyboard to the mouse/touchpad. This feature can be used only on selecting the Review action first.
Review action without selection of Tag groups:
Review action with Single-Select enabled for Tag Groups:
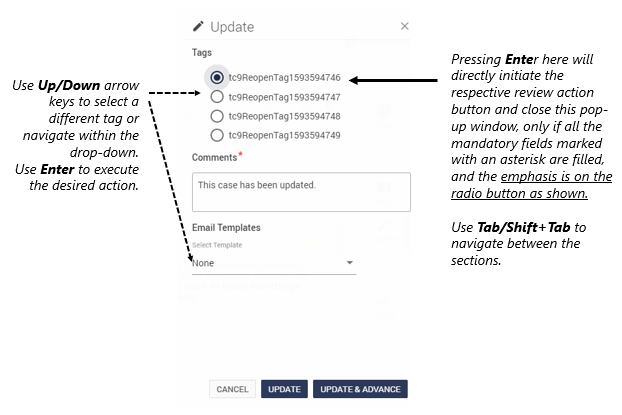
Review action with Multi-Select enabled for Tag Groups:
Enabling Echo-Cancellation for Conversations
To know more about setting up Echo-Cancellation for conversations, refer the Echo-Cancellation for Conduct topic.
Selecting a Conversation for Review
To select a conversation for review, perform the following steps:
Select the Conduct tab in the Enterprise Archive UI. The My Review Queues page appears.
Click a queue to select it. The Review page appears and displays a list of conversations.
Select one or more conversations you want to review. The conversation details appear in the Details panel.
After you have accessed a conversation for review, the Action pane provides you with options that help you complete the review process.
As a reviewer you can claim, update, release, escalate, assign, or close a conversation, using options from the Action pane.
The actions that can be performed and their corresponding action icons are listed below:
|
Action |
Action Icon |
Keyboard Shortcut |
|
Claim |
|
M |
|
Update |
|
U |
|
Release |
|
M |
|
Escalate |
|
E |
|
Assign |
|
N |
|
Close |
|
C |
|
Reopen |
|
- |
|
Track Action Status |
|
n/a |


Claiming a Conversation
When reviewers claim a conversation they assign it to themselves. A reviewer cannot view a conversation that is claimed by another reviewer. The Claim option is disabled if the conversation is already assigned to you.
Once you claim a conversation for review, it moves down in the list of conversations displayed in the Documents pane.
To claim a conversation for review, perform the following steps:
Select the conversation that you want to claim for review, following the Selecting a Conversation for Review procedure.
Click the Claim action button in the Action pane. The Claim dialog appears.
(Optional) Enter your comments (if any), in the comments dialog. Select an email template if required and then click Ok. The conversation gets claimed and automatically moves to the bottom of the list of conversations appearing in the Documents panel.
Updating a Conversation
Enterprise Archive allows you to update a conversation with additional comments. You can add updates on an assigned or an unassigned conversation.
To update an unassigned conversation, you must have the Update unassigned permission allowed to your user role.
To update an assigned conversation, you must have the Update assigned permission allowed to your user role.
To update a conversation item, perform the following steps:
Select the conversation that you want to update, you can follow the Selecting a Conversation for Review procedure.
Click the Update action icon in the Action pane. The Update dialog appears.
(Optional) Enter your comments (if any), in the comments dialog. Select an email template if required and then click Ok. The conversation gets updated and automatically moves to the bottom of the list of conversations appearing in the Documents panel.
Assigning a Conversation to Another Reviewer
Enterprise Archive allows a reviewer to assign and re-assign a conversation to another reviewer at the same review level. You can also assign a conversation to your self for review.
To assign an unassigned conversation, you must have the Assign unassigned permission allowed to your user role.
To re-assign a conversation, you must have the Re-assign permission allowed to your user role.
To assign or re-assign a conversation to another reviewer, perform the following steps:
Select the conversation that you want to assign to another reviewer or your self, you can follow the Selecting a Conversation for Review procedure.
Click the Assign action icon in the Action pane. The Assign dialog appears.
Select a reviewer from the Assign To drop down list.
(Optional) Enter a comment in the Comments text box. You can provide a reason for assigning the conversation to another reviewer in this text box.
Select an email template if required and then click Ok.
The conversation gets assigned and is greyed out. Reivewers that have been assigned at the next level will now view these conversations in the Assigned state. Queue administrators will be able to view these conversations by using Admin search.
Releasing a Conversation
Releasing a conversation makes it unclaimed and available for claiming to the other reviewers in the Queue. You can release a conversation from your Conduct queue only if a conversation is claimed by you or assigned to you. Re-assigning a conversation to another reviewer automatically releases a conversation from your review list.
To release a conversation, perform the following steps:
Select the conversation that you want to release, following the Selecting a Conversation for Review procedure.
Click the Release action icon. The Release dialog with the Comments text box appears.
(Optional) Provide a reason for releasing the conversation in the comments box. Select an email template if required and then click Ok.
Escalating a Conversation
Enterprise Archive allows reviewers to escalate a conversation to a reviewer at a higher review level for further attention.
To escalate an unassigned conversation, you must have the Escalate unassigned permission allowed to your user role.
To escalate an assigned conversation, you must have the Escalate assigned permission allowed to your user role.
To escalate a conversation, perform the following steps:
Select the conversation that you want to escalate, you can follow the Selecting a Conversation for Review procedure.
Click the Escalate action icon. The Escalate dialog box appears.
If Tags have ben configured for the Escalate action while setting up the queue, then the first Tag is selected by default.
Enter a valid comment for escalating the conversation. The Comment section is mandatory and requires the minimum character limit that has been configured for the selected Tag.
Select a reviewer from the Assign To drop down list. This field is optional in cases where reviewer assignment must be done a later point of time.
Important
If a reviewer has not been assigned, then the document will remain in an escalated state and cannot be escalated further.
(Optional )Select an email template if required and then click Ok.
The conversation gets escalated and is greyed out. Reivewers that have been assigned at the next level will now view these conversations in the Escalated or Assigned state. Queue administrators will be view these conversations by using Admin search.
Closing a Conversation
Enterprise Archive allows reviewers to close a conversation.
To close an unassigned conversation, you must have the Close unassigned permission allowed to your user role.
To close assigned conversation, you must have the Close assigned permission allowed to your user role.
To close a conversation, perform the following steps:
Select the conversation that you want to close, you can follow the Selecting a Conversation for Review procedure.
Click the Close action icon. The Close dialog with the Comments text box appears.
(Optional) Enter a valid comment for closing the conversation.
Select an email template if required and then click Ok. The closed conversation moves out of your document list of the queue.
Re-opening a Closed Conversation
Enterprise Archive allows reviewers the ability to re-open a closed conversation.
To re-open a conversation, the Re-Open permission must be enabled for your role.
Selecting Re-Open without assigning to a reviewer will move the conversation to Re-Opened state, while making an entry in the Audit History pane.
Selecting Re-Open with assigning to a reviewer will move the conversation to Assigned state, while making 2 entries in the Audit History pane. The first entry will indicate Re-Opened state, and the second will indicate Assigned state.
One Click Close for Conduct
If you have a workflow that requires Reviewers to tag an action with a specific reason, for example, closing an item as a false positive versus a true positive, the Tags in Tag Groups allow Reviewers to quickly select from a list of choices, rather than having to retype the reason each time they take an action on an item. For workflows that do not require Reviewers to add comments or that do not differentiate between false and true positives (that is, you would close either as simply “reviewed” or other term), you can use the One-Click Close Action feature. If this feature is enabled, clicking the Closed action button will immediately mark the item as “Closed” and automatically select the next new item in the Review Queue for action to be taken.
Enterprise Archive allows reviewers to close a conversation in Conduct without having to add comments, or tags. To enable one-click close for a conversation, the Reviewer has to enable this tag option while setting up a Queue. For more information on adding tags, refer Adding a Tag Group section.
Performing Bulk Review
Bulk review allows the user to select multiple conversations for review by selecting the check box to the left of the conversation . The Conduct Admin user can specify the upper limit for the maximum number of conversations that can be selected for bulk review purposes.
To set this value, from the Conduct workspace, select Options from the Configure menu. The following options will be displayed:
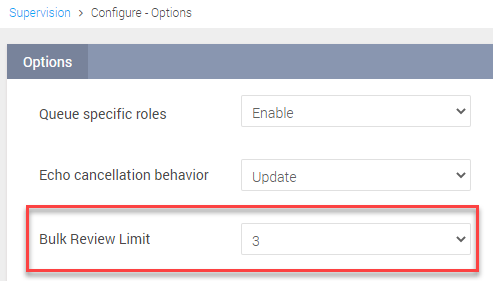
The Bulk Review Limit field is a drop-down listing from 2 to 50. The default selected value is 50.
Important
In case the user selects conversations more than the specified limit, the UI will display an error stating the specified limit.
The Bulk Review feature is permission controlled.
In case of failures during processing, the failed state only for those documents that could not be processed will be updated.
Bulk review is applicable only to documents from the same queue and of the same level.
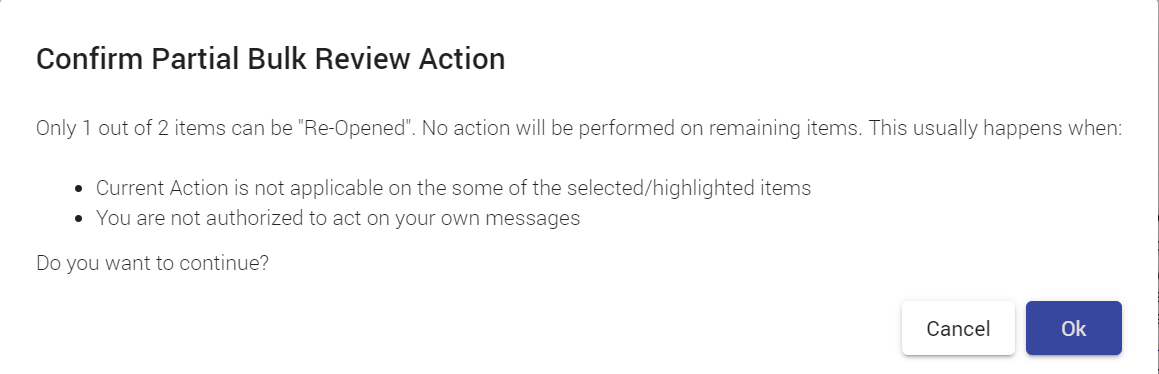
Use Case: When the bulk review action is applicable only to a subset of the selected documents.
In this case, users will be prompted with an error message stating that the desired bulk review action is not applicable to all the items, as shown in the example below.
Use Case: When bulk review action has been selected for documents from multiple queues/levels.
In this case, users will be prompted with an error message stating that the bulk review action cannot be completed, and the user has to select documents from the same queue, and belonging to the same level as shown in the image below:

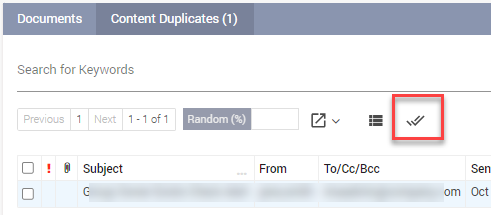
Use Case: Using Bulk Close for Duplicate Documents
Bulk close can be performed for duplicate documents from the Content Duplicates tab. Clicking on the duplicate documents icon in the Related Documents column will open the Content Duplicates tab. Select the Close option as highlighted in the image below to perform a bulk close.
Tracking Action Status
Enterprise Archive allows you to track the action status of documents in a review queue.
Click Track Action Status button. The Track Action Status dialog appears with the list of actions performed on the documents in a review queue.

Click the Refresh button to view the updated action status of a documents in a review queue.
Important
Users can view the status of bulk actions (2 or more documents) only from the Track Action Status dialog. Actions performed on a single document will not be captured.
Exporting Audit History Details
The reviewer has the ability to download audit history details of a conversation from the Conduct pane. Use the steps below to export audit history details:
Select the conversation that you want to export the audit history details, you can follow the Selecting a Conversation for Review procedure.
Expand the audit history details by clicking on the Audit History tab in the snapshot pane.
Download the audit history details by clicking on the Download Audit History icon. The audit history is downloaded as a CSV file.
Email Notification
Enterprise Archive also gives the reviewer the ability to send an email notification to the supervised participant while performing Conduct actions. This functionality is not applicable for bulk reviews. To send an email notification, perform the following steps:
Select a conversation from the queue and click the required Conduct action button.
The Notify Sender dialog box is displayed on selecting the required action button.
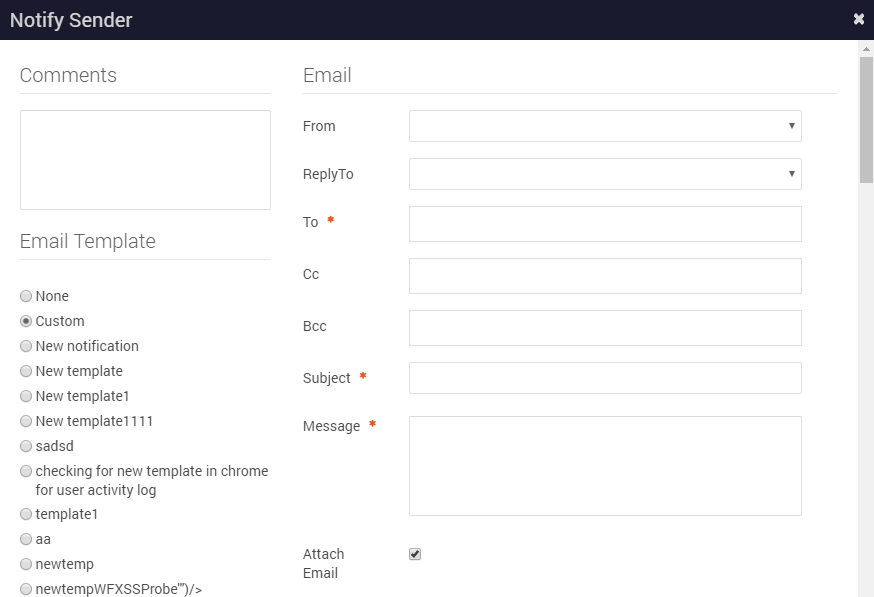
The user can select from the following options in the Notify Sender dialog.
Comments (Optional) - Enter comments if any in the Comments text box.
Email Template - Email template has the following options to choose from:
None - Select this option if you do not intend to send an email.
Custom Template - Select this option to enter a user desired message to a recipient.
Available Templates - Select from a list of available templates.
Attach Mail - Enabling this check box includes the original conversation as a .txt attachment while sending the notification. By default, this check box is enabled.
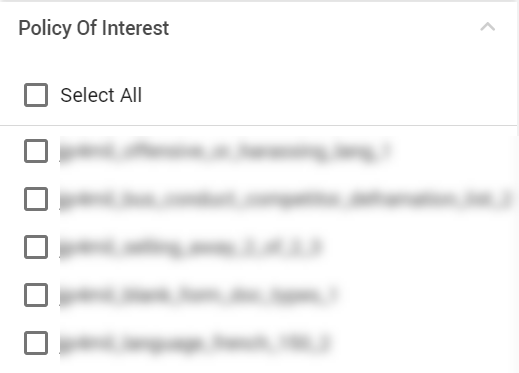
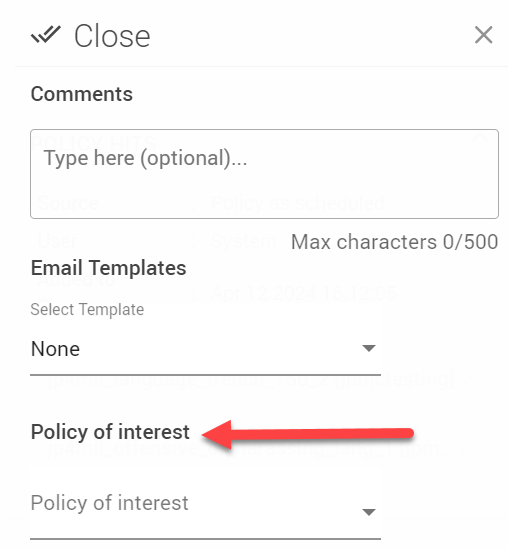
Policy of Interest
Policy of Interest allows reviewers the ability to assign one or more specific policies to a document, in addition to the matched policies, when performing a review action. This allows reviewers to identify the reasons for concern identified on the alerted message. This is particularly useful when reviewers want to focus on a specific policy when assigning or escalating documents for further review.
Note
Policy of Interest can also be added to non-alerted messages when viewing them using Admin Search.
The Policy of Interest option is available for all review actions.
To assign a Policy of Interest, perform the following steps:
On selecting a review action, the reviewer has the ability to select from all the policies that have been configured for the queue.
On assigning a Policy of Interest, the document will be matched to the selected policy going forward.
Reviewers can now search or refine search results by using the Policy of Interest search facet as shown below: