Refining and Saving Search Results
This section provides information on the following features:
Refining Search Results
The Refine Results tab under the Search panel helps you filter your search results based on categories such as participants, networks, or communication channel, and so on.
Granular Refining of Search Results
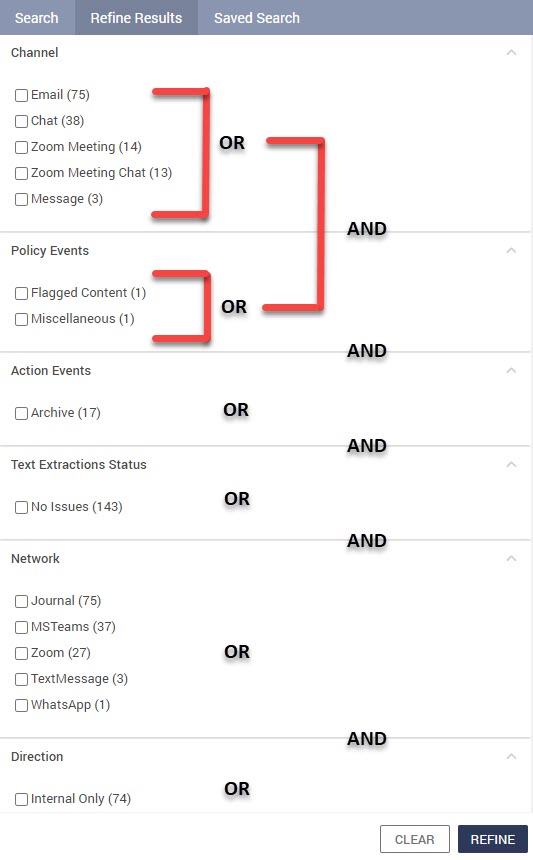
Consider that a search is performed, and search results are displayed, in such a case Enterprise Archive allows you to further refine the search results. You can use the Refine Results tab for this purpose. The Refine Results tab displays multiple refinement criteria that can be selected to further refine the search results. Select your refinement criteria and click Refine. You can then again refine results over the refined results using the same method and so on. To go back to the previous results you need to remove selection from the last refinement criteria that you selected. The Refine search results behavior is as explained below:
Search results within a Search filter are exclusive and hence have an OR condition. Selecting one or more results from within the OR box will eliminate the other results.
Search results across search filters are inclusive and hence have an AND condition. Selecting one more results across Search filters will include all results.
Refining Search Results for Specific Participants
Enterprise Archive allows you to search for interactions involving specific participants. When you are searching for interactions using the Search tab in the Search Archive panel, you can select specific participants with other search criteria such as Words/Phrases, Date Range, Networks, Communication Channels, and Holds.
Refining search results for participants is applicable for all types of participants (internal, external and public participants). If you perform a search such that the search criteria contains participants, then the Refine Results tab displays the Full Name or the Display Name of those selected participants along with the Networks and Channels for further refining the search results.
When you select one or more participants in your search criteria, the Refine Results tab provides you with a maximum of top ten participants that are mostly involved in the retrieved conversations. The remaining participants are not listed for refinement in the Refine Results panel, however their conversations are listed in the Documents panel.
If ten or less than ten participants are selected in a search operation, then all these participants will be listed in the Refine Results tab.
The refinement criteria displayed in the Refine Results tab is generated from the XML files containing the participant information that are imported from point products (like Connected Capture IM & Collab:Vantage and Connected Capture Social:Socialite). These are in the precedence First_name, Last_name, Network_displayname, and Network_endpointid. The Network_endpointid is a mandatory field and can not be missed in the XML files.
By default, Enterprise Archive generates the refinement criteria from the First_name. If the XML file does not contain the First_name, Enterprise Archive generates the refinement criteria from the Last_name. If the Last_name is also not present then Enterprise Archive generates the refinement criteria from the Network_displayname. Assuming that the First_name, Last_name and Network_displayname are all not present in the XML, then in such a case Enterprise Archive uses the Network_endpointid to generate the refinement criteria.
If you perform a search such that the search criteria does not contain participants, then only the starting alphabet of the Full Name or the Display Name of the participant would be displayed in Refine Results tab, along with Networks and Channels for further refining the search results.
Also, if you are performing a search with the search criteria containing more than one public participants, then the Refine Results tab displays Unknown Public as the refinement criteria.
To search and refine results for specific participants:
Perform a search with the desired search criteria.
Click the Refine Results tab in the Search panel. The Refine Results tab displays the matched search filter columns.
To refine the search result, you can select the checkboxes against any of the listed search filters. The Documents panel displays the refined results.
Other Refining Behaviors
It is possible that in some cases there can be more than one participant with the same network identity. For example, ‘Singh ,Ajay’ is a participant with network identity ‘asingh@smarsh.com’, and ‘Singh, Abhishek’ is another participant with same network identity ‘asingh@smarsh.com'. In such a case, if conversations for both participants are present in the system and a search is performed for any one of the participants, then the Participant filtering options in the Refine Results tab displays filtering options for both ‘Singh, Ajay’ as well as for ‘Singh, Abhishek’.
Consider a single participant having three network identities, with three different display names in the following manner:
'srao@smarsh.com’ with display name ‘Rao ,Sunil ’
‘srao@gmail.com’ with display name ‘Rao ,Sunilkumar’
‘sunil@gmail.com’ with display name ‘Kumar ,Sunil’
In such a case, when the participant is selected in the search criteria (for example, ‘Rao, Sunil’), then Refine Results tab displays the following refinement criteria for the participant:
‘Rao, Sunil’
‘Rao, Sunilkumar’
‘Kumar ,Sunil’
Refining the results from the Refine Results tab is supported only for Tier-1 data.
Please note that the documents to be refined may contain both Tier 1 and Tier 2 data. To refine your search results, select the appropriate criteria from the Refine Results tab and click Refine. The refined search results will display only Tier-1 data.
Saving and Publishing Search Results
Enterprise Archive does not auto save any of the searches in the Archive Management Search work space. The user will have to perform the steps listed below to save a search. These saved search results are listed in the Saved Search tab under the Search Archive panel. The Saved Search results will serve as a search template while performing scheduled exports from the Archive Management workspace. To reuse the saved search results while performing Scheduled Exports, the user will have to publish the saved searches from the Saved Search tab as explained in the following section.
To save and publish search results:
Perform the procedure listed in Archive Management Search when DLM is Disabled.
Click Save. The Save Search dialog box appears.
Type a name for the search result in the text box appearing in the Save Search dialog box, and click Save.
The Saved Search panel displays a list of saved searches as shown in the following image:

Clicking anywhere on the saved search box will run the saved search.
Clicking the ellipsis on a saved search will list the following options:
Edit— Select this option to modify the saved search results.
Pin— Select this option to pin a saved search to the top of the search listing page. Pinned searches will be sorted based on when the search criteria was last modified.
Publish— Select this option to publish the saved search to be used as a search template for performing Scheduled Exports.
Delete— Select this option to remove the saved search.