Configuring Policies
Configuring policies allow you to select communication messages based on specified criteria and filters.
The following topics detail how to configure Policies:
Configuring Policies Workspace
The configuring policies workspace is shown in the following figure:
The user can choose from the following options available in the Configuring Policies workspace:
Add Policy - Select this option to add or create a policy.
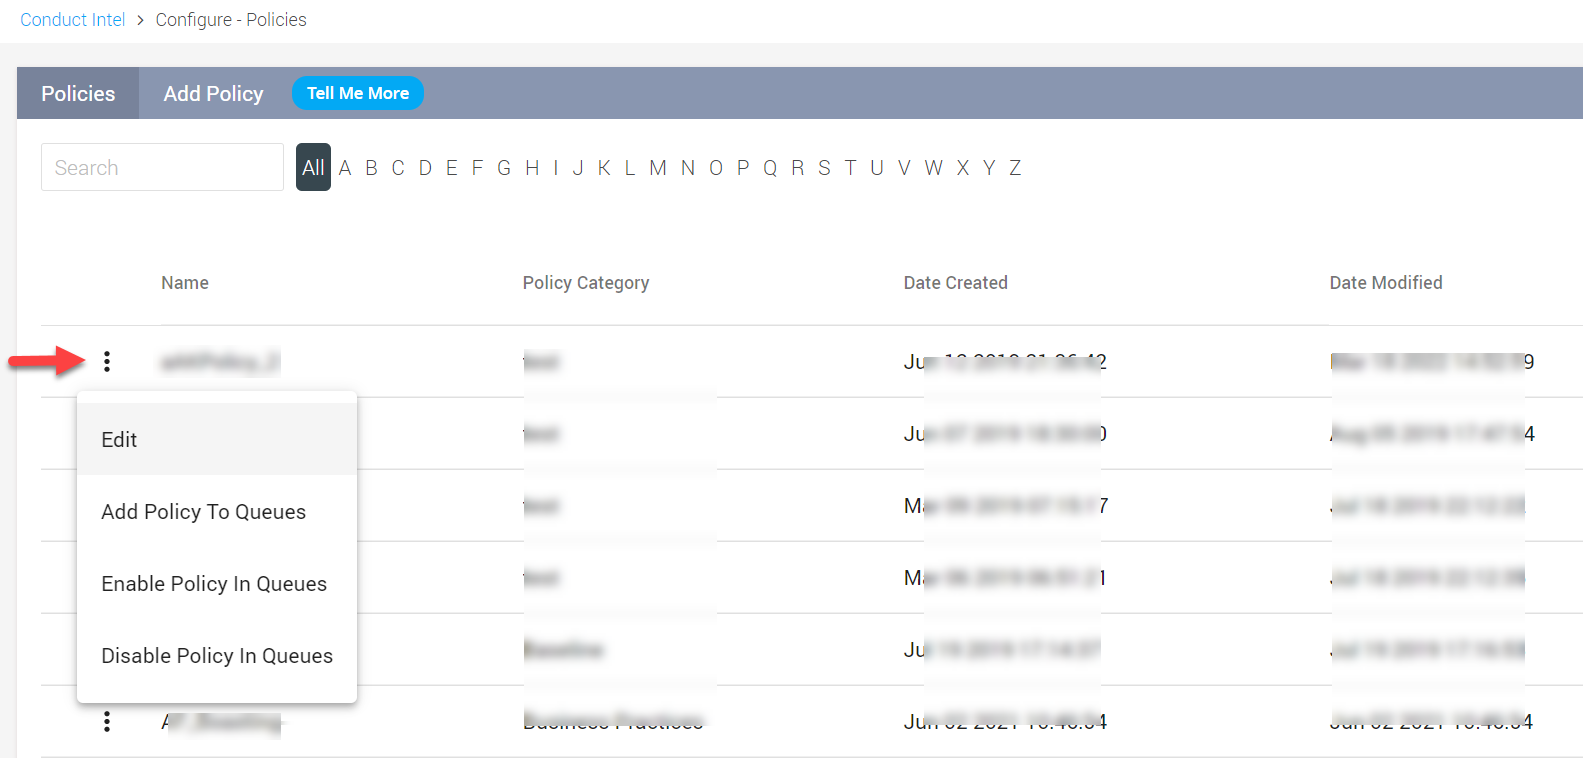
Clicking the elipsis against each policy lists the following options:
Edit - Select this option to Edit the policy.
Add Policy To Queues - Select this option to add a policy to multiple queues. The user can select from a list of queues that are available and the policy is not part of. By default, the Select Queues window displays 100 queues. Use the pagination button to add queues from other pages and click Add. A Selected Queues updated snackbar appears confirming that the policy is added to the selected queues.
Enable Policy in Queues - Select this option to enable a policy in multiple queues. The user can select from a list of queues that the policy has been added to, however has not been enabled.
Disable Policy in Queues - Select this option to disable a policy in multiple queues. The user can select from the list of queues that the policy has been added to and is enabled.
Adding a Policy
To add a policy:
Click the Conduct tab in the Enterprise Archive UI.
Click Policies under Configure from the Conduct workspace.
Click Add Policy next to Policies.
Type a unique name for the policy in the Name box.
Select from the following options:
Upload Policy - Selecting this option will allow you to upload a JSON policy file to be used. The Policy workspace will be greyed out on selecting this option.
Conduct customers who have Cognition enabled, will be able to access out-of-the-box Cognition scenarios during the Upload Policy step.
Cognition scenarios will only be available when the Policy Type option is selected as Flag.
Create Policy - Selecting this option will allow you to create a custom policy based on the available filters.
Type a new policy category or select an existing policy category from the Policy Category: select or enter a policy category drop-down.
Policy Category helps in categorizing of policies in a logical manner to identify the nature of conversations. For example: "Insider Trading" or "Racial Discrimination".
Select a Policy Type from the drop-down. The available options are:
Flag - Selecting this option will fetch communications that match the set parameters for this policy.
Ignore - Selecting this option will ignore communications that match the set parameters for this policy.
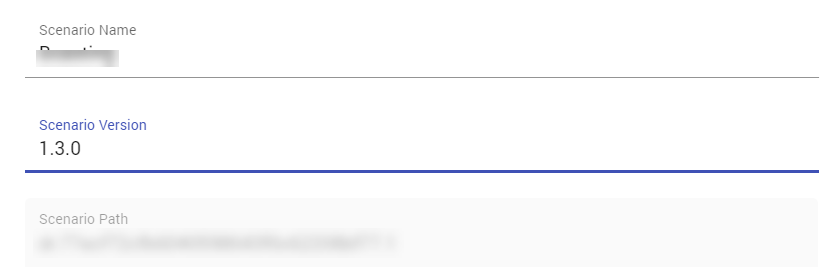
Subject to Cognition availability in a customer's environment, users can also select from a list of Cognition scenarios. Subsequently users can select the desired scenario version, while the path location will also be displayed as shown in the image below:
For more information on Cognition scenarios, refer the Cognition topic.To enable Echo Cancellation feature for a policy, select the check-box labelled Enable Echo cancellation for this policy. For more information on this feature, refer the Echo-Cancellation for Conduct section.
Configure the required policy parameters. The following table describes the parameters.
Table 6: Policy ConfigurationsOptions
Description
Words/Phrases
List of Terms
List of Terms allows you to search for words that match any or all of the following combinations:
Must have all of these keywords
Must have at least one of these keywords
Must not have any of these keywords
Advanced Query
Advanced Query allows you to configure a search query that can contain phrases, boolean, and proximity operators.
Where to Search
Allows you to search all or any of the following parts of a message. Select the check box against any or all of the following parts to apply them to the search criteria:
Subject
Body
Attachment
Attributes
Email Header
Direction of Communication
Select any or all of the following direction of communications:
Internal Only—fetches communications within the organization.
External Only—fetches communications in which all participants are external.
External Inbound—fetches communications in which external participants are sending a message to one or more internal participants.
External Outbound—fetches communications in which internal participants send messages to one or more external participants.
External Bidirectional—fetches communications having internal and external participants with no specific direction of communication, for example, chat rooms.
Action Events
Select the action events you wish to apply to the query, such as Add Disclaimer, Block, Copy Message, Modify Subject, and so on.
Policy Events
Select the policy events to apply to the query, such as Infected Content, Moderated Content, Size Limit Exceeded, Blocked Content, and so on.
Network
Select the network for communication, such as Facebook, Yahoo, and so on, from the Network group box.
Communication Channel
Select the mode of communication, such as Email, IM, Chat, Blog, and so on, from the Communication Channels group box.
Click Save. Your new policy is saved and is also listed in the Policies page.
Editing a Policy
You can edit an existing policy in Conduct.
To edit a policy created by you, you must have the Create and edit my Policies permission enabled for your role.
To edit a policy created by another reviewer, you must have the Edit any Policy permission enabled for your role.
To edit an existing policy:
Click the Conduct tab in the Enterprise Archive UI.
Click Policies under Configure from the Conduct workspace. The Policies page appears, and the existing policies are listed in this page.
Select the Edit option by clicking the elipsis against the policy to be edited.
Edit the fields you want to modify.
Click Save. The "Policy updated Successfully." message appears.
After configuring policies, the next step in Conduct is Creating Queues.
MUSTX Policy Rules
While creating a policy, follow the rules listed below to ensure the desired search results are returned.
A maximum of 50 keywords should be present in the MUSTALL criteria.
A maximum of 50 keywords should be present in the MUSTNOT criteria.
The MUSTANY criteria can contain any number of keywords.
An error message will be displayed in Enterprise Archive if the list of terms exceeds 50 for the MUSTALL and MUSTNOT criteria.
Use Cases for Query Search Criteria
Refer to the following use case scenarios to know more on how to specify effective search policies.
Table 3: User Cases for Query Search Criteria
|
Use Case |
Scenario |
Search Lexicons |
Additional Search Criteria |
|
Gift and Entertainment Policy Violation |
To supervise all email communications that were sent or received by participants from the procurement department of your company for any possible gift and entertainment policy violation, using the lexicons mentioned in the Search Lexicons column. Method: Using term based search (List of Terms option). |
Gifts & Entertainment:
Confidential Documents:
Insider Trading:
|
|
|
Rogue Trading and Fraud Policy Violation |
To Supervise all forms of communications for selected participants in your company for any fraudulent trading activity (Insider Trading), using the lexicons mentioned in the Search Lexicons column. Method: Using Advanced Query with proximity search. |
Rate Setting:
Collusion:
|
|