Create and Execute a JSON Policy
IMPORTANT
Working on Conduct policy requires basic understanding of .JSON structure. For basics on creating a .JSON document, refer https://json-schema.org/
To create a Conduct policy using .json or a .txt file:
Identify the list of terms and communication types to be added to the policy.
Decide the type of policy you wish to create:
FLAG
Used to fetch communications that are required to go through the Conduct workflow. This is the default policy type.
IGNORE
Used to skip or ignore communications that are not required to go through the Conduct workflow. IGNORE is used in tandem with one or more policy of Flag type and leads to a kill-list of documents which are filtered out from list of documents fetched by Flag policies. Considering the limited use of Ignore policies, document ID is the only detail of documents which is fetched.
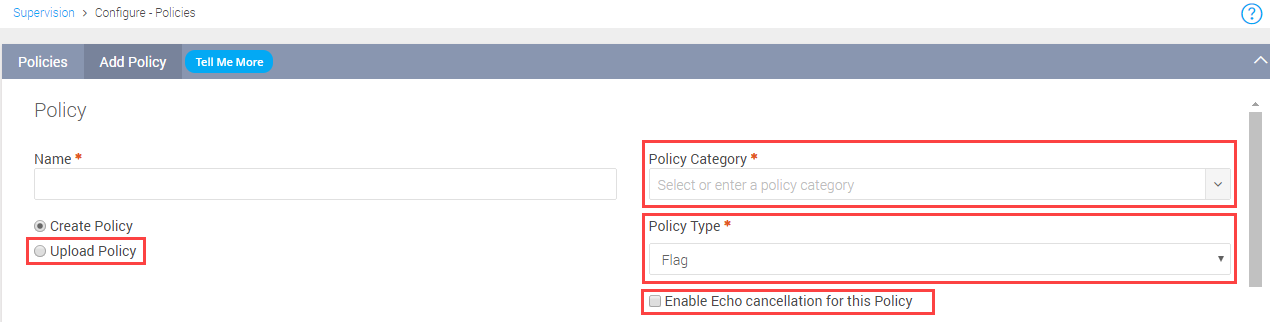
To enable Echo cancellation, select the Enable Echo Cancellation for this Policy check-box. For more details, see Echo-Cancellation for Conduct.
The following sections details step-by-step instructions on how to create a Conduct policy based on the following use cases:
Use Case 1 - Standard Policy - Insider Information
A Standard policy uses both WORDSANDPHRASES and FILTERS.
Create a Standard policy for Insider Information to identify insider trading within an organization. That is, the policy must identify the employee communication sharing information about stocks and share prices through a communication tool or collaboration network.
Step-by-Step Instructions
Identify the list of terms that are usually used in insider trading. Add them inside the WORDSANDPHRASES field or in the LEXICONS field. You can also use a combination of both.
In the example, Fundraising, Shares, Stock, Transactions are the terms identified.Identify the MUSTX occurrence criteria to be followed.
In the example, MUSTANY is the occurrence used.Identify the zones in the communication to be monitored. Create a ZONES section and add the identified zones.
In the example, Subject and Body are the zones used.Identify the valid attributes to be specified in the ROLES field.
In the example, to/cc/bcc along with endpointids attribute is used.Identify the employee/participants or groups whose communication needs to be monitored. Create PARTICIPANTS section.
In the example, ALL participants with the specified ROLES are used.Identify the tool or collaboration network to be monitored and add them in the NETWORKS filter.
In the example, lync, aim and Sharepoint are used.Identify the channels to be monitored and add them in the CHANNELS filter.
In the example, journal, chat, email, im are used.
{ "WORDSANDPHRASES" : { "MUSTANY" : { "ZONES" : ["Subject","Body"], "TERMS" : ["fundraising","Hot* FOLLOWEDBY Stock~","share*"], "LEXICONS" : ["LexSet1","LexSet2","LexSet3"] } }, "LEXICONS" : { "LexSet1" : ["Unethical","What FOLLOWEDBY,6 happened to my mutual fund","What FOLLOWEDBY,6 happened to my polic*"] "LexSet2" : [""guarantee", "stock", "profit"] "LexSet3" : ["additional | add'l FOLLOWEDBY,1 info* for the above FOLLOWEDBY,2 trade* | transaction*(buy | bought | b FOLLOWEDBY,2 shares | units)" }, "FILTERS": { "PARTICIPANTS": { "MUSTALL": { "AND" : [ { "ROLE": "to/cc/bcc", "ENDPOINTIDS" : ["@ao*l.com"] }, { "OR" : [ {"ROLE": "to/cc/bcc", "GROUPS": [ "GWM"] }, {"ROLE": "to/cc/bcc", "GROUPS": [ "Advisor"] } ] } ] } }, "NETWORKS":[ "lync", "aim", "sharepoint"], "CHANNELS":[ "journal", "chat", "email", "im"] }} Use Case 2 - Lexicon-only Policy - Bribes and Kickbacks
A Lexicon-only policy has TERMS defined either as a LEXICON or LEXICON_LIST without FILTERS.
Create a Lexicon-only Policy for Bribes and Kickbacks in an organization. That is, the policy must identify the employee communication on bribe and kickback incidents.
Step-by-Step Instructions
Identify the list of terms that are usually used in a bribe or kickback communication. Add them to the Lexicon file.
In the example, terms identified are listed in BribeKickback1 and BribeKickback2 files.Upload the Lexicon file to Enterprise Archive.
Identify the MUSTX occurrence criteria to be followed.
In the example, MUSTANY is the occurrence used.Specify the file names in the LEXICON_LIST field.
{ "WORDSANDPHRASES": { "MUSTANY": { "LEXICONS_LIST": [ "BribeKickback1", "BribeKickback2" ] }, }}pay off* | pay-off* | paid off PRECEDEDBY,2 accept* | receiv* | take* | taking | tookpay* | paid FOLLOWEDBY,1 her | him | me | them | their | there | they*re | you* | us FOLLOWEDBY,2 offpay* up PRECEDEDBY,3 time to | you | upocket PRECEDEDBY back | in my | in our | in his | in her | in their | in there | in they*repretend* FOLLOWEDBY,2 don* | did not | didn*t | had no | have* | never FOLLOWEDBY,1 hear* | know* | knewpriceless FOLLOWEDBY,3 info*promis* FOLLOWEDBY,2 will not | will never | won*t | would not | wd not | would*nt | wdn*tpromis* FOLLOWEDBY,2 secret | secrecy | silence | silent risky PRECEDEDBY to | tooruin FOLLOWEDBY,1 her | him | his | them | their | there | they* | ur | you*r*schtup* | shtup*scratch* your back | scratch* UR back | scratch* my backsecret PRECEDEDBY,2 our | littleshare FOLLOWEDBY,2 profitworth FOLLOWEDBY,2, her | his | my | our | you*r*Use Case 3 - Filter Only Policy
A Filter-only policy has only FILTER filed without any references to LEXICON or LEXICON_LIST.
Create a Filter-only policy to fetch all communication with either attachments sent or received between specific dates from certain networks.
Step-by Step Instructions
Identify the type of attachments within communications to be filtered.
In this example, PDF and doc are the file types. Add them under FILE_EXTENSIONS filter.Identify the communication types.
In this example, external mixed outbound is the communication type. Add them under COMMUNICATION_TYPES filter.Identify the networks from where the communications must be filtered.
In this example, lync network is the network. Add lync under NETWORKS filter.Identify the date range to filter the content.
In this example, communications archived between 12 October 2018 and 14 October 2019 are filtered. Create a DATE filter accordingly with respective attributes.
{ "FILTERS": { "AND": [ { "FILE_EXTENSIONS": [ "pdf", "doc" ] }, { "OR": [ { "COMMUNICATION_TYPES": [ "external mixed outbound" ], "NETWORKS": [ "lync" ] }, { "DATE": [ { "DATE_TYPE": "Archived", "RANGE_TYPE": "Between", "FROM": "2018-10-12T12:10:30", "TO": "2019-10-14T11:20:30" } ] } ] } ] }} Execute a Conduct Policy
You can execute a policy using the following ways:
Executing a policy on demand is not the recommended way to run a queue. This should mostly be used to test a policy for a shorter date range or under exceptional situations only.
Executing a Policy On Demand
To execute the created .JSON or .txt policy on-demand:
Log in to the Enterprise Archive application.
Navigate to the Conduct workspace.
Click Policies under the Configure menu.
Click the Add Policy tab.
Click the Upload Policy option.
Enter a Name of the policy to be uploaded and click SELECT FILE.
Upload the file from your PC.
Select a Policy Category and Policy Type.
Select Flag for a flagged policy or Ignore for an Ignore Policy.Click Save.
Navigate to the Policies tab, select the uploaded policy and click Add to Policy Queues.
Select a Queue from the Select Queues window and click Add.
Click the Configure menu and select Queues.
From the Queues page, click the edit icon
 beside the queue selected in step 11.
From the Edit Queue page, in the Policies pane, click RUN.
Ensure that the uploaded policy is enabled.
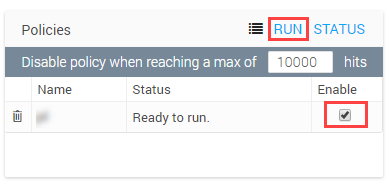
From the Run Policy window, enable the uploaded policy and click Run.
A Run Policy Status is displayed stating that the request is submitted. Click OK.
(Optional) Click STATUS from the Policy pane to view the status of the policy execution. For more information, see Policy Status.
Click Save.
Navigate to My Review Queues and select the respective queue.
Documents based on the configured .JSON or .txt policy are displayed in the Documents pane.
Schedule a Policy
To schedule the created JSON policy:
Log in to the Enterprise Archive application.
Navigate to the Conduct workspace.
Click Policies under the Configure menu.
Click the Add Policy tab.
Click the Upload Policy option.
Enter a Name of the policy to be uploaded and click SELECT FILE.
Upload the file from your PC.
Select a Policy Category and Policy Type.
Select Flag for a flagged policy or Ignore for an Ignore Policy.Click Save.
Navigate to the Policies tab, select the uploaded policy and click Add to Policy Queues.
Select a Queue from the Select Queues window and click Add.
Click the Configure menu and select Queues.
From the Queues page, click the edit icon
beside the queue selected in step 11.From the Edit Queue page, in the Policies pane, ensure that the uploaded policy is enabled.
Click Save.
The policy runs only once in 24 hours (00:00:00 hours) in a pre-defined time zone, and only on the data that is ingested in the last 24 hours in the defined time zone. The queues are updated with the new results that match the policy filter only from the previous day's communications.