Migrate Retention Policies using Custom Attributes
Overview
During a migration if it is required to retain multiple message-level retention values, custom attributes can be utilized in Enterprise Archive to achieve this desired output. This document provides the details on how to configure and achieve this result.
Ahead of a migration, the custom attribute values are required to be embedded as EML headers with a specific syntax and in addition, as Retention Targets in Enterprise Archive. It is imperative that the custom attribute name and associated value from the header match what is configured as the custom attribute name and value pair as a Retention Target.
Embedding custom attributes to the data can be done by journaling the data to Email Gateway or by directly updating the XML file.
Email Gateway
Email Gateway (EGW) embeds custom attributes to the EML file that is converted to XML before ingesting into Enterprise Archive.
Updating the XML Directly
If you are directly ingesting data to Enterprise Archive, ensure that the XML files are updated with custom attributes.
Workflow
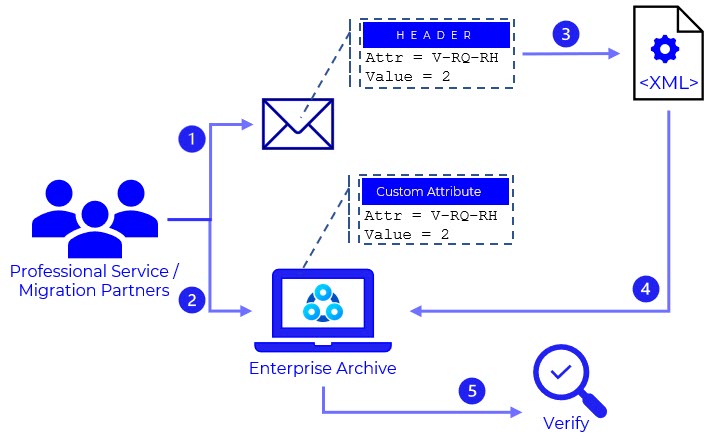
The migration partner or Smarsh Professional Services decides the attribute and value and add them to the EMLs Header in the following format:
X-SMARSH-EA-Attr-Name=Value
Where, Name=CustomAttribute name and Value=CustomeAttribute’s value.
Example: X-SMARSH-EA-Attr-V-RQ-RH=2. Here, V-RQ-RH is a custom attribute name and 2 is custom attribute value.Pre-configure the same attribute and value as a retention target for a retention policy in Enterprise Archive as custom attributes. See Setting Custom Attributes in Enterprise Archive.
Important
Ensure to set the custom attributes before the documents are ingested into Enterprise Archive, else retention policy will not apply.
Attributes from the EML are extracted and converted to an XML file that is ingested to Enterprise Archive.
Enterprise Archive applies the retention policy once a match is made between the XML file and the set custom attributes.
Setting Custom Attributes in Enterprise Archive
Login to Enterprise Archive application.
Create a new retention policy for the documents that are being migrated. For more information, see Defining a Retention Policy.
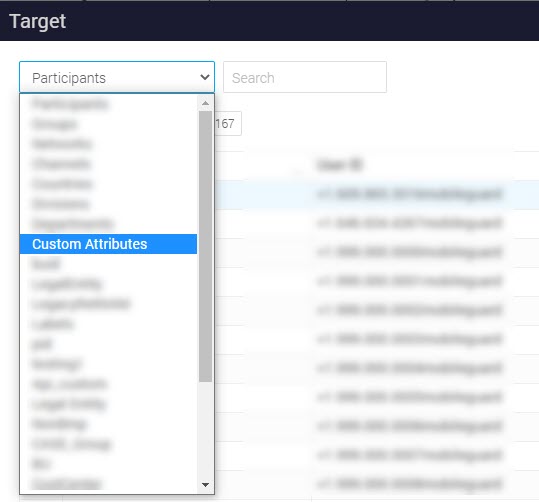
Once a policy has been created, you have to define targets by clicking the gear icon
 in the Target column.
In the Target window, click the drop-down and select Custom Attributes.
Enter the Attribute Name and Attribute Value as received from the Professional Services team or Migration partners.
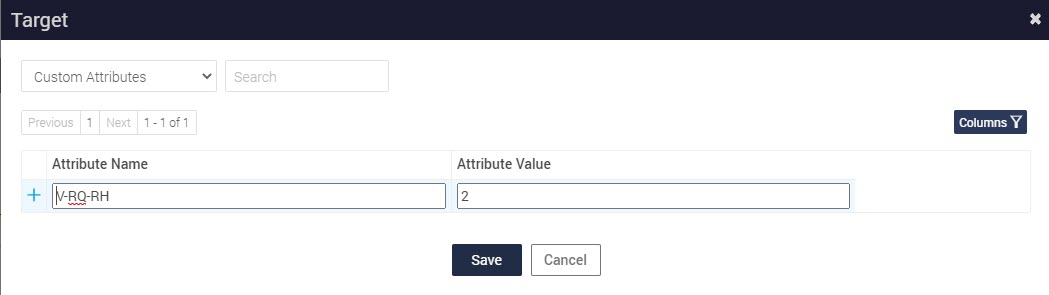
Click
 .
.Click Save.
Verification
To verify if the retention policy is migrated and applied to the ingested documents:
Login to Enterprise Archive application.
Click Archive Management > Search and search for the ingested documents.
Open the document from the search results, navigate to View 3 and click Retrieve Retention Details.
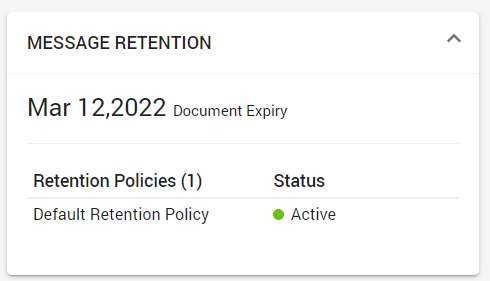
The policy name is displayed. This implies that all documents with custom attributes are ingested successfully.