Case Management Scheduled Exports
Scheduled Exports allows users to save their search criteria, and create a scheduler to export the saved search results at desired intervals. Scheduled Exports also allows users to specify a location of their choice, and select the desired format for the exported documents.
You can setup Scheduled Exports from the Case Management workspace as described in the following procedure. Clicking Scheduled Exports under the Case Management tab will display the following screen.
Important
For information about the Failover/Failback Mitigation plan for Scheduled Exports along with the limitations, see the FAQs section .
Figure 1: Scheduled Exports Workspace

The following actions can be performed from the Scheduled Exports workspace:
|
Action |
Description |
|
Add a Scheduled Export |
Click Add a Scheduled Export to setup a scheduled export. |
|
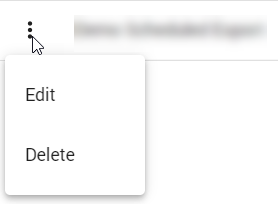
|
Click the vertical ellipse to either Edit or Delete an existing scheduled export. |
|
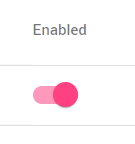
|
The switch interface enables you to either enable or disable an existing scheduled export. Note that once a scheduled export is created, it will be enabled by default. |
Adding a Scheduled Export
More than 1 million documents cannot be exported per Scheduled Export. If a scheduled export contains more than 1 million documents, a pop-up message stating “No. of documents selected for exports is greater than 1 million docs, please refine the export criteria and try again.“ is displayed.
If more than 1 million documents are identified:
You will not be able to create a new Scheduled Export.
Enterprise Archive skips the date range and proceeds to the next Scheduled Export, before triggering a Scheduled Export. Exports skipped will show as Skipped in the Exports listing page.
A failure email notification is triggered to the creator of the Scheduled Export, in an ongoing Scheduled Export.
This behavior is implemented to prevent outages caused due to large number of exports.
To add a scheduled export:
Click Scheduled Exports under the Archive/Case Management workspace, and click Add a Scheduled Export. The following screen is displayed.
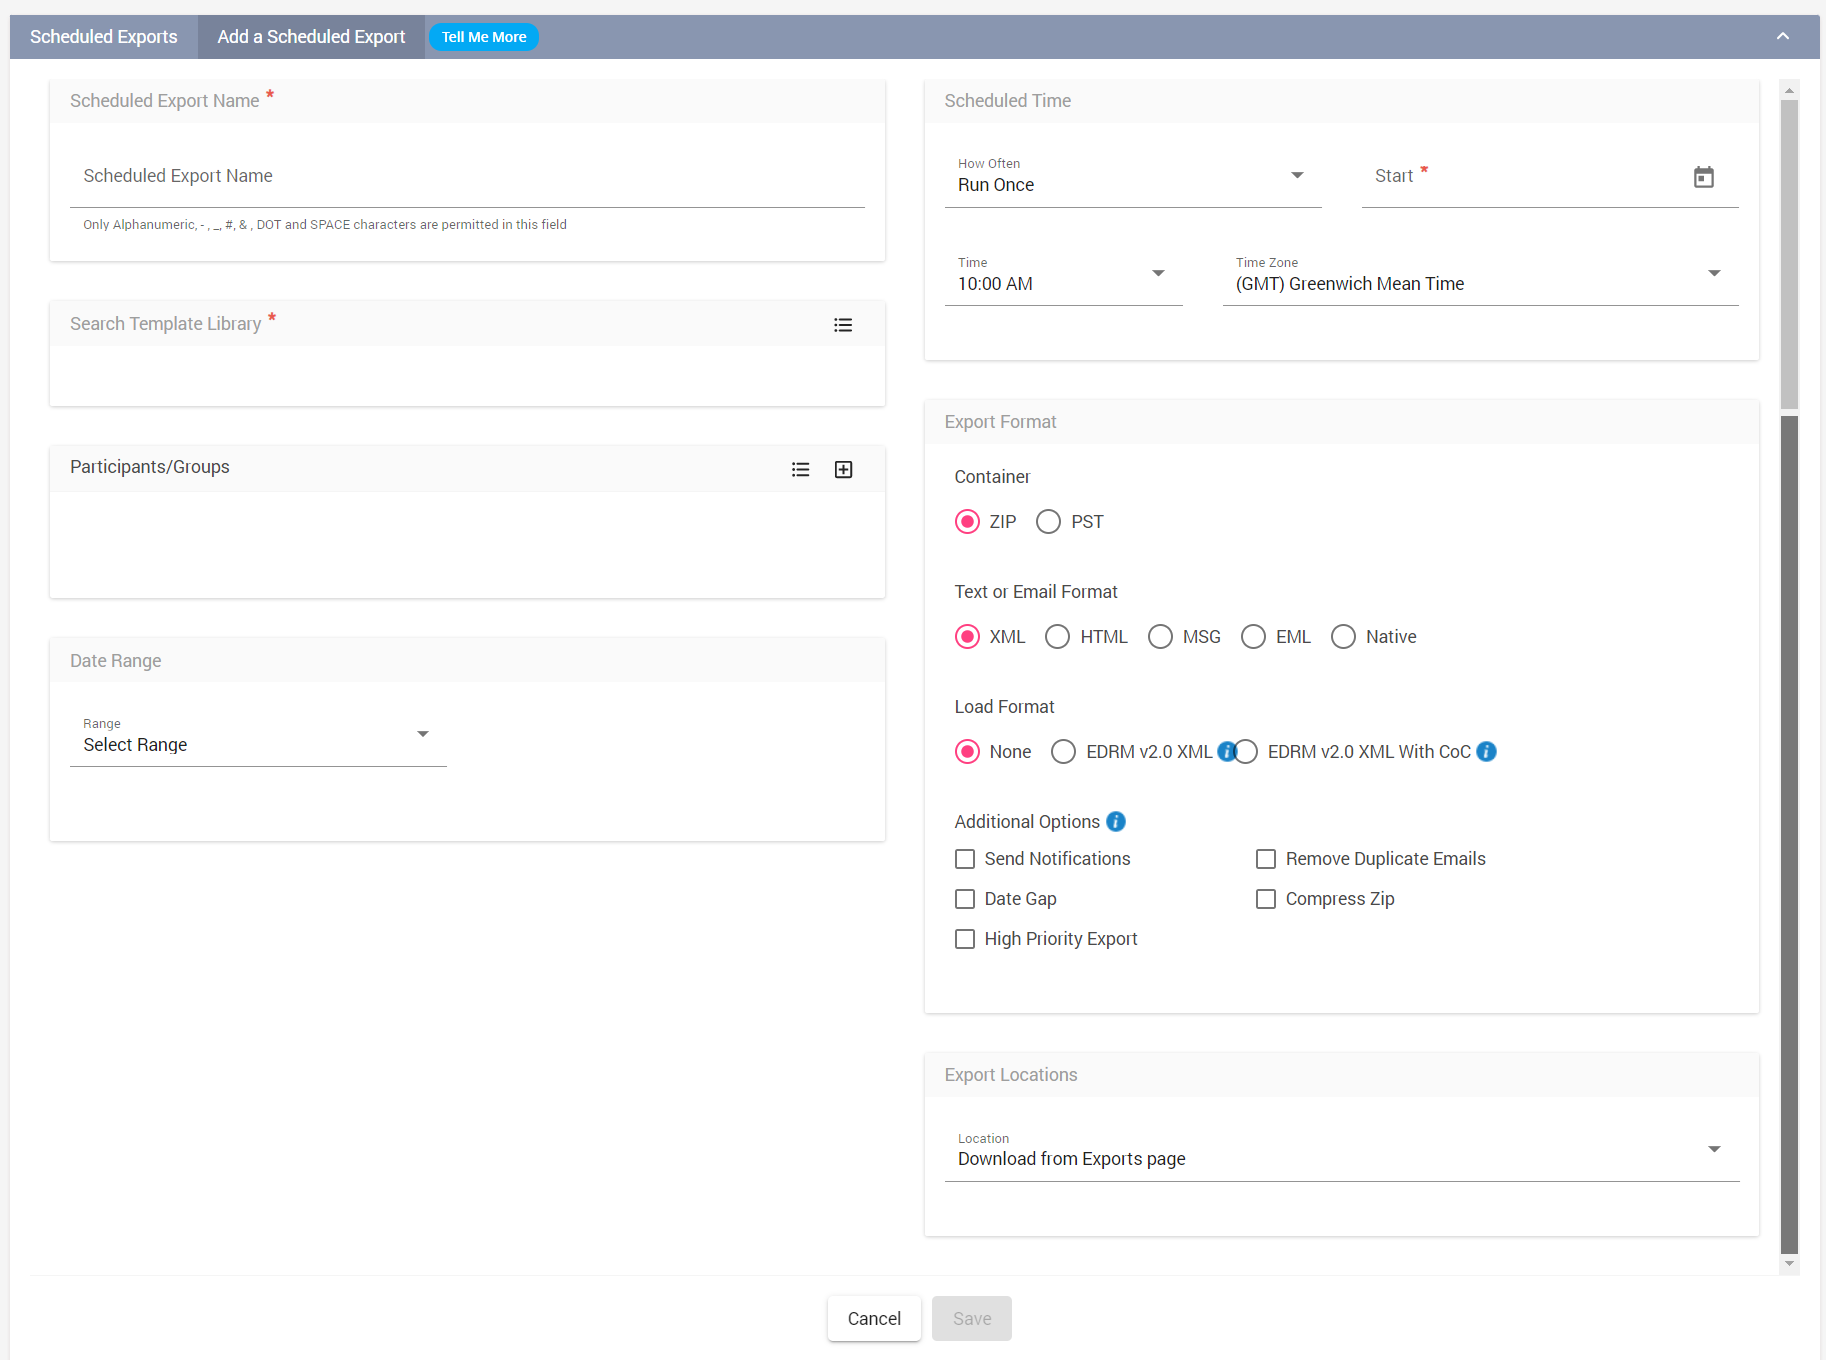
Enter a valid name in the Scheduled Export Name field.
Click the (
 ) icon to select a Search Template Library. A Search Template is created when the saved search criteria is published from the Archive Management Search workspace.
Similarly, a search template is created in Case Management workspace when the saved search criteria is published from the Case Management Search workspace.
Select the desired template and click Add.Apply the added Search Template to specific participants/participant groups by clicking the select (
)/add (  ) against the Participants/Groups option. The Search Template will apply only to the participants/participant groups that have been added, and will not include the participants/participant groups who were part of the Search Template.
The user can further filter the search results by selecting one of the following options:
Any of these - Selecting this option will display search results containing any of the selected Participants/Groups.
All of these - Selecting this option will display search results containing all the selected participants/Groups.
Selecting Internal Participants
Click the
icon next to Participants/Groups. The Select Participants screen appears.
Select the participant(s) and/or group(s) you are interested in and click Add.
You can also filter the Participants/Groups by clicking the Recipient Type button next to the Add button, and selecting from the following options:
Any - Selecting this option will filter the participants/groups who are part of any of the distribution lists such as From, To, CC, and BCC.
From - Selecting this option will filter the participants/groups who are part of the From distribution list only.
To - Selecting this option will filter the participants/groups who are part of the To distribution list only.
Cc - Selecting this option will filter the participants/groups who are part of the Cc distribution list only.
Bcc - Selecting this option will filter the participants/groups who are part of the Bcc distribution list only.
To/Cc/Bcc - Selecting this option will filter the participants who are part of the To, Cc, and Bcc distribution lists.
Click Close to exit the dialog.
Adding Internal, External, Public, or Federated Participants
Click the
icon to add external participants/groups. The Add Participants/Groups text-box appears with two panes.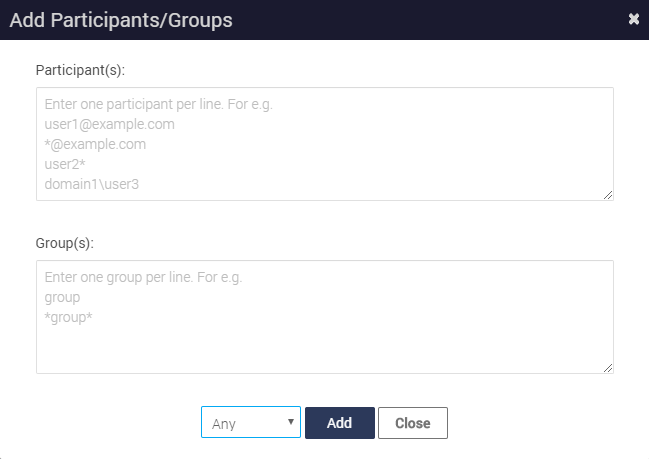
Enter the external or public participant's network display name or their Network Endpoint ID. One line per participant (the top pane) and/or name of the group (the bottom pane)
Click Add. To add more public participants, enter their respective Network Display Names or Network Endpoint ID, and then click Add.
You can also filter the Participants/Groups by clicking the Recipient Type button next to the Add button, and selecting from the following options:
Any - Selecting this option will filter the participants/groups who are part of any of the distribution lists such as From, To, CC, and BCC.
From - Selecting this option will filter the participants/groups who are part of the From distribution list only.
To - Selecting this option will filter the participants/groups who are part of the To distribution list only.
Cc - Selecting this option will filter the participants/groups who are part of the Cc distribution list only.
Bcc - Selecting this option will filter the participants/groups who are part of the Bcc distribution list only.
To/Cc/Bcc - Selecting this option will filter the participants who are part of the To, Cc, and Bcc distribution lists.
Once you have completed adding participants, click Close.
Select a Date Range from the list of options provided to further filter the search results, as shown in the following screen.
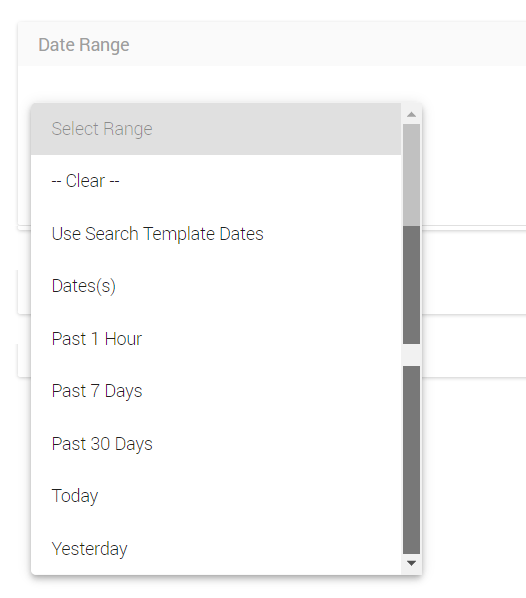
The available options are:Use Search Template Dates: Select this option to retain the date range present in the Search Template.
Date(s): Select this option to specify a date range and further filtering based on the following types of data:
Archived: The date/time when the interaction was received in Enterprise Archive.
Sent: The actual send date/time specified in the interaction.
Past 1 Hour: Select this option to filter search results for a one-hour time period.
Past 7 Days: Select this option to filter search results for a seven-day time period.
Past 30 Days: Select this option to filter search results for a 30-day time period.
Today: Select this option to filter search results for the same day that the Scheduled Export task is configured.
Yesterday: Select this option to filter search results for the previous day from when the Scheduled Export task is configured.
Select a Scheduled Time from the options provided which will determine the frequency of the Scheduled Exports task, as shown in the following screen:
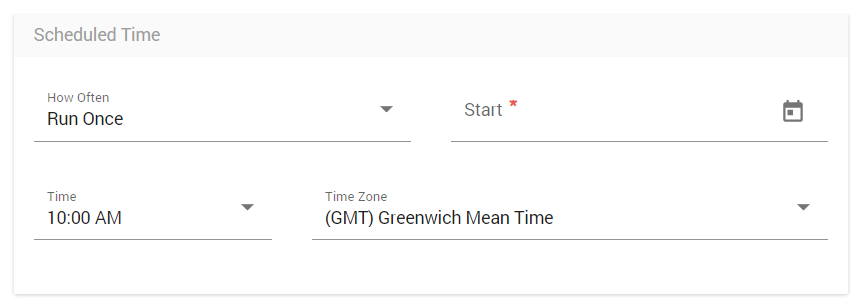
The available options are:Run Once: Select this option to run the Scheduled Export task once only, by specifying a Start Date/Time.
Run Frequently: Select this option to run the Scheduled Export task at a set Recurrence, and by specifying a Start Date/Time. The available options are:
Hourly
Daily
Weekly
Run Now: Select this option to run the Scheduled Export task immediately.
Time Zone: Select the desired time zone from the list of time zones provided. The Time Zone field is applicable only to the Run Once and Run Frequently options.
Select a document format to export the conversations from Text or Email Format. The available document formats are:
XML
HTML
MSG
EML
Native
To export all instant messages into a single consolidated file, select the Zip option under Container, and the HTML format from Text or Email Format options. After you export, the downloaded ZIP file contains a full-snapshot-N.html file. This HTML file provides a consolidated view of all the exported messages and can be viewed in any Enterprise Archive supported web browser.
Select one of the following Load Format options:
None - To get the exported document in a simple XML or HTML format.
EDRM v2.0 XML - To get the exported document in an Electronic Discovery Reference Model (EDRM) format.
EDRM v2.0 XML With CoC - To get the exported document in an Electronic Discovery Reference Model (EDRM) format with CoC (Chain of Custody) enabled. Chain of Custody guarantees Enterprise Archive users data authenticity and ensures the data has not been tampered with from the time it has been ingested until the final download.
Select one of the following Additional Options:
Send Notifications - Enabling this check-box enables email notification to be sent when the export jobs have completed.
Remove Duplicates - Enabling this check-box eliminates duplicate conversations from the final export package. Duplicate emails are email conversations that are similar except for minor differences such as header information and so on.
Currently, De-duplication is supported only for email data.
De-duplication will be done based on the fields configured by the Operations team for a specific Enterprise Archive tenant.
The dedup.csv summaries the email messages ingested containing identical messages but with minor differences in the header or body along with the respective snapshot IDs. Whenever the user selects Remove Duplicate Emails in an export request, multiple emails having the same Body, Attachments, and so on will be suppressed in the exports. As a result only one email having the same parameters will be included in the export.
The typical fields that are configured include Subject, Body, Attachments, Sender/Recipients, and Date/Time stamp. Fields can be added or removed based on your requirement by configuring a server property. The permitted values for configuration are Body, Attachments, To, From, Sender, Subject, Cc, Bcc, Date, or any other subsets of these values.
The summary.txt file will have the high level details of suppressed documents such as dedup count, whether dedup was enabled or not and the value of the property during the export.
Compress Zip - Enabling this check-box will compress the final packed zip file.
Date Gap - Enabling this check-box generates a report containing the total number of items found per day in a date range specified per conversation.
High Priority Export - Enabling this check-box ensures the selected documents will be prioritized for export above any other documents in queue.
Include Expanded Participants -Includes the complete list of participants in a communication.
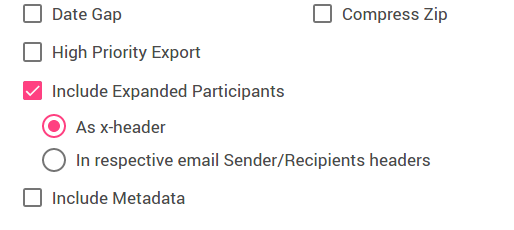
You can choose between the following options:
As x-header - Includes all DL and participants information within the interaction, which can be viewed as internal headers. That is additional x-headers such as X-ACTIANCE-RECIPIENTS and X-ACTIANCE-SNAPSHOT-ID containing all the participants in the communication including the ones expanded from Distribution Lists and BCC. This option is selected by default.

In respective email Sender/Receipients headers - Includes all participant information inline. That is, the DL and participants information are available in the respective To, Cc, Bcc, or From fields in the exported interaction.
DLs without Participants Expansion
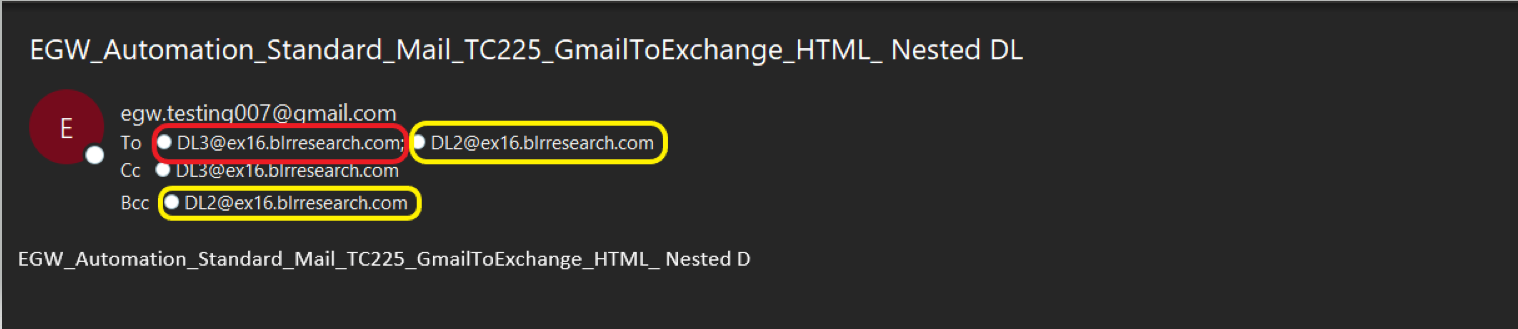
DLs with Participants Expansion
Include Metadata - Enabling this check-box will include communication metadata.
The final step while creating a scheduled export is to select the Export Location. The exported files can be downloaded from the selected options in the drop-down such as:
Download from Exports page - Selecting this option means the scheduled exports can be downloaded from the Exports page in Archive Management or Case Management respectively.
A list of SFTP locations that have been added in the Export Locations page, where the data is exported to unique sub-folders. The SFTP server details such as Server IP Address, Folder Name and Location Type are displayed.
For users to distinguish data for each export and also to provides the capability to segregate exports for each line of business, Enterprise Archive automatically creates sub-folders if they do not exist in the SFTP server. To automatically create sub-folders, write permissions must be granted to the account that is used to create the SFTP Export Location.
Click Save.