Exporting Case Content
Important
The various export options that are possible from the Enterprise Archive eDiscovery workspace are:
Export conversation content during the Collect/Review phase.
Schedule exports based on search criteria.
The following sections explain these operations.
Exporting Search Results from the Collect and Review Workspace
You can export conversations from the Case Management workspace while performing the following operations:
Collecting a Case
Reviewing a Case
The export feature in Enterprise Archive allows you to export entire communications or just communication metadata as displayed in the column view. To export search results:
Multiple Communications: Select the desired communications by checking the corresponding checkboxes. Then, click the Export button.
Single Communication: Click the Download/Export button associated with the specific communication.
Multiple exports can be initiated in parallel by selecting and exporting different sets of items. This topic explains how to use the Export feature in Enterprise Archive.
What are the content types that can be exported?
Entire Communication Content: Export the communication content type in various format as desired. Multiple communications can be combined to export into a container. To know more, refer the Exporting Communication Content topic given below.
Communication Metadata Content: Communication metadata refers to message attributes such as Snapshot ID, From, To, Network, Channel, and so on. To know more, refer the Exporting Communication Metadata topic below.
Communication as Email Attachment: To download/view an offline copy of the communication from the message pane, use the application's one-click download feature. To know more, refer the Downloading Communications section.
Are there any limitations on the number of documents being exported?
The limit is set 1 million documents per export. That is, clicking Export All or Export All as CSV button in the search results page with more than 1 million documents results in displaying the following error message:
“No. of documents selected for exports is greater than 1 million docs, please refine the export criteria and try again.“ is displayed.
This behavior is common across exports performed in Archive Management, Case Management, and Supervision applications.
This limitation is set to prevent outages on export.
Are there any file size limitations while exporting documents?
If the size of an exported package exceeds
1 GB
, the package is divided into multiple chunks. This applies for both ZIP and PST files, and each chunk will not exceed 1 GB in size.
The UI displays the progress for long-running exports, particularly for exports larger than 4 GB. A notification message will indicate that a large export is in progress and may take longer to complete.
Are there any limitations while exporting messages with inline images?
Certain image types such as .webp are not supported by Outlook or other mail clients, hence Enterprise Archive will not render those inline images when exported as an EML.
Are there any limitations in PDF exports?
Export to PDF feature is unavailable for Export All option. As a workaround, select all docs and click Export Selected .
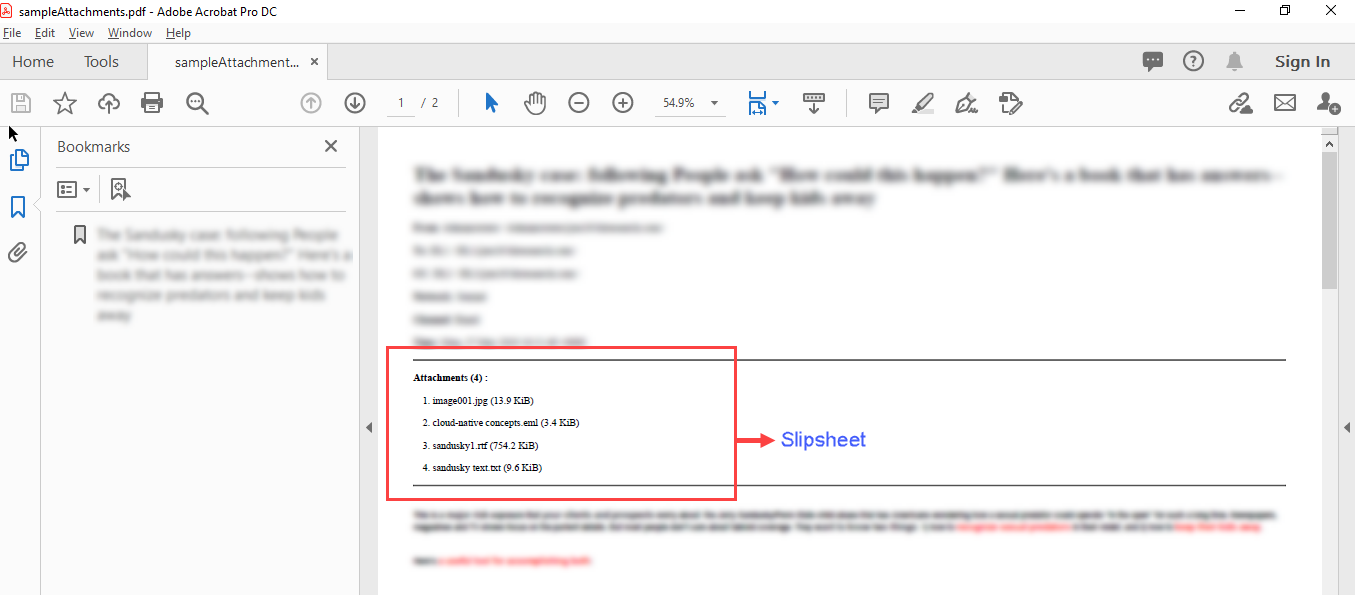
Attachments within the document are exported in separate folders. Information on the list of attachments is appended as a slipsheet in the exported PDF. The slipsheet available at the header section of the PDF lists the number of attachments in the exported document along with the file name, extension, and the size of the attachment.
Other limitations that are observed in an exported PDF document:
Foreign languages are currently not supported. Documents only in English can be exported.
Documents more than 5 MB of body content cannot be exported. The size limit applies also while exporting multiple documents.
Images with broken hyperlinks does not appear.
Inline images having HTTPS (with SSL) link does not appear.
Images beyond the page size of 1500 x 1942 pixels (96 DPI) appear truncated.
Font colors are not preserved for interactions converted from RTF to HTML.
CSS tags appear for documents that contain inline images (having tables styles).
Multiple unwanted lines are displayed.
Header links for meta.html files appears.
Data in Journal documents are printed twice.
Alignment issues are observed in case of certain documents and documents containing inline calendars.
What are the resulting file type when documents are exported as Native?
When you export , the resulting file type is as follows:
When you export documents from the following media as Native, the resulting file type is as follows:
|
Original Media |
Content Source |
Resulting File Type |
|
Facebook IM |
Socialite |
HTML |
|
Facebook Posts |
Socialite |
HTML |
|
|
Socialite |
HTML |
|
Bloomberg IM |
Vantage |
HTML |
|
Bloomberg IM |
API |
HTML |
|
Bloomberg EML |
Vantage |
|
|
Bloomberg EML |
API |
|
|
Outlook |
EGW |
EML |
|
MSG Files |
ITM XML |
If attribute under ITM XML is as follows: MS-OXProps-Version =<"1" "2" or "3"> MS-OXProps-Message ="<any value>" Native Output: MSG Else, Native Output: EML |
|
EML Files |
ITM XML |
EML |
What happens when "Remove Duplicate Emails" is enabled?
Currently, Deduplication is supported only for email data.
Whenever the user enables Remove Duplicate Emails in an export request, all nearly identical email messages are suppressed in the export. As a result, only one copy of an email having the same email elements (Subject, Body, Attachments, and so on) are included in the export.
The email is deduplicated by calculating a hash on the email elements. If the hash value matches for two email messages, they are considered as duplicates. The email elements that are used by the hash calculation are configured by the Enterprise Archive Operations team for each tenant.
The following email elements can be configured for the deduplication hash calculation are Date, From, Sender, To, Cc, Bcc, Subject, Body, Attachments. All other email headers are ignored for deduplication. If one of the above email elements is removed from the configuration, then that element will be ignored when calculating the deduplication hash value.
The export output contains a dedup.csv file which lists the email messages that were suppressed in the export because they were duplicates. The export also contains a summary.txt file which is a high-level report showing the deduplication count and whether the deduplication feature was enabled for the export.
How to view and download completed exports?
Completed exports can be downloaded from the Exports menu in each application. For more information refer the Viewing Exported Conversations topic.
How fast are the exports in various export formats?
On processing 1 GB of data, here is a report on average export speed in the following formats:
|
Export Formats |
Average Export Speed |
|
ZIP-EML |
3600 docs/minute |
|
ZIP-XML |
2700 docs/minute |
|
ZIP-MSG |
1500 docs/minute |
|
ZIP-Native |
1500 docs/minute |
|
ZIP-HTML |
1080 docs/minute |
|
ZIP-PDF |
120 docs/minute |
|
PST-MSG |
480 docs/minute |
The export takes a longer time to complete if the following export options are selected:
Include Metadata option under Additional options.
EDRM v2.0 XML or EDRM v2.0 XML With CoC options under Load Format.
How are timestamps handled in exported data?
All timestamps in the archive are stored in GMT. When searching within the UI, results may be displayed in a localized timezone. However, any exported content, including search results, will consistently reflect GMT timestamps.
What is an export guardrail? How is it implemented in Enterprise Archive?
An export guardrail is a set of guidelines and rules that regulate the export process. In Enterprise Archive, the implementation of export guardrails involves setting limits to control the export of data. By establishing and enforcing these guardrails, Enterprise Archive maintains control over the amount of data exported, ensuring adherence to compliance regulations and preventing potential issues that may arise from excessive exports. The export guardrail is implemented for both regular exports and CSV exports formats.
For Tier 1 and Tier 2 exports in Enterprise Archive, the guardrail is set at 1 million snapshots . If this limit is exceeded, the export process will not be triggered, and error messages will be displayed on the user interface (UI).

The following error messages serve as alerts to inform users that the export limit has been crossed:
|
Condition |
Message Displayed |
|
Count of Tier 1 exports > 1 million |
Count of documents selected for Tier 1 exports exceeds 1 million, please refine the export criteria and try again |
|
Count of Tier 2 exports > 1 million |
Count of documents selected for Tier 2 exports exceeds 1 million, please refine the export criteria and try again |
|
Count of Tier 1 exports > 1 million and count of Tier 2 exports > 1 million |
Count of documents selected for Tier 1 exports exceeds 1 million and count of documents selected for Tier 2 exports exceeds 1 million, please refine the export criteria and try again |
Exporting Communication Content
To export communication content from the search results:
here are two methods for exporting communications, depending on whether you want to export all communications or a specific one:
Exporting All Communications:
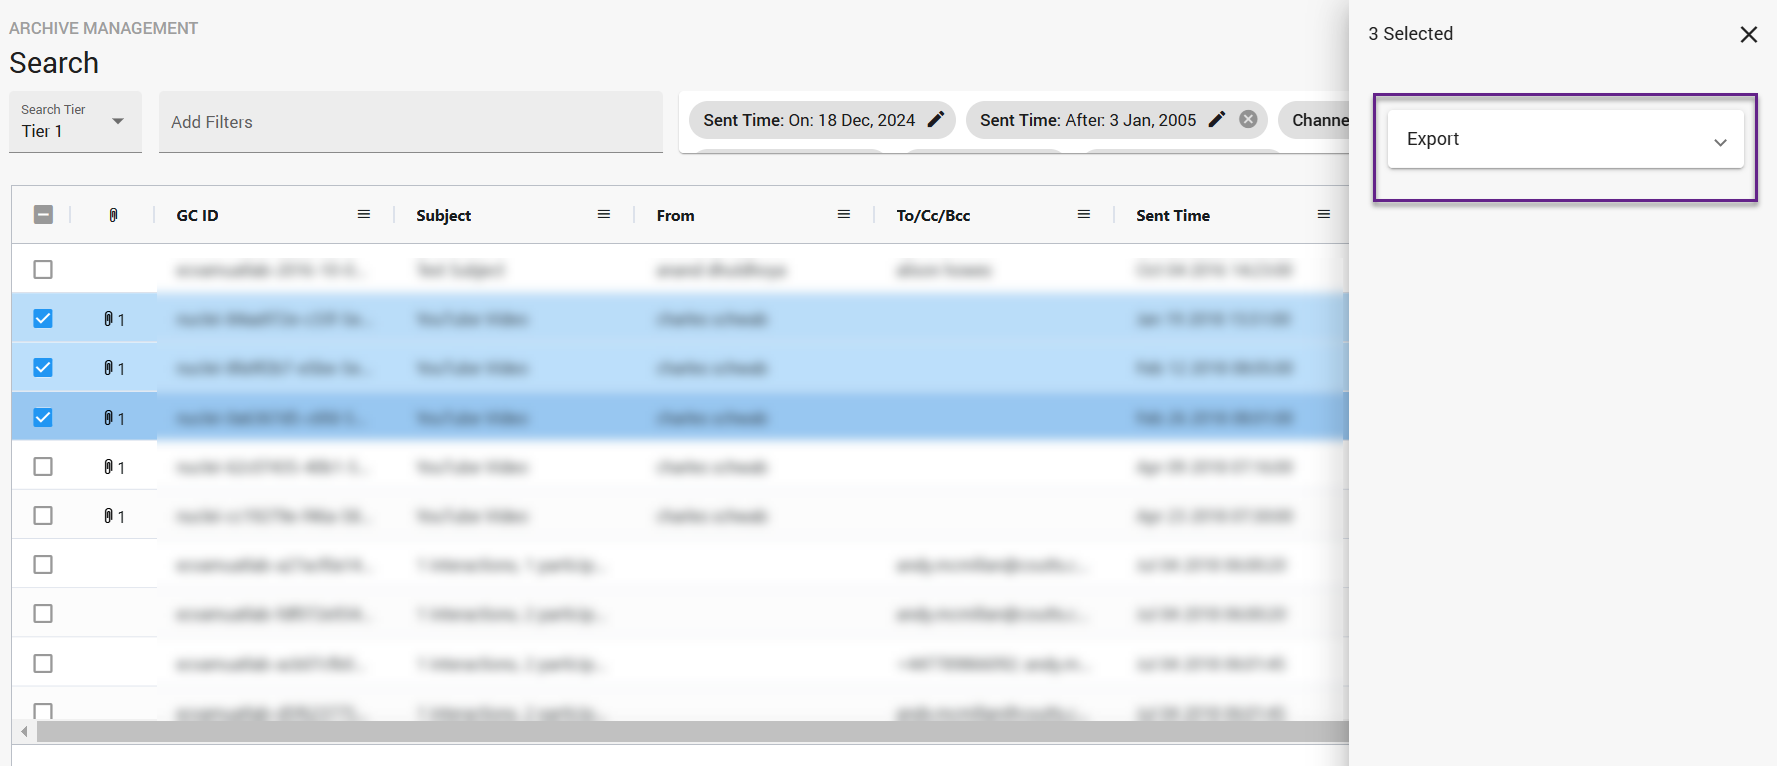
Select the checkbox adjacent to each communication you wish to export. Alternatively, you can select the checkbox in the header row to select all communications displayed in the current view.
Click the Export button.
Exporting a Single Communication:
Select the checkbox adjacent to the desired communication within the list.
Click the Download/Export button associated with that specific communication.
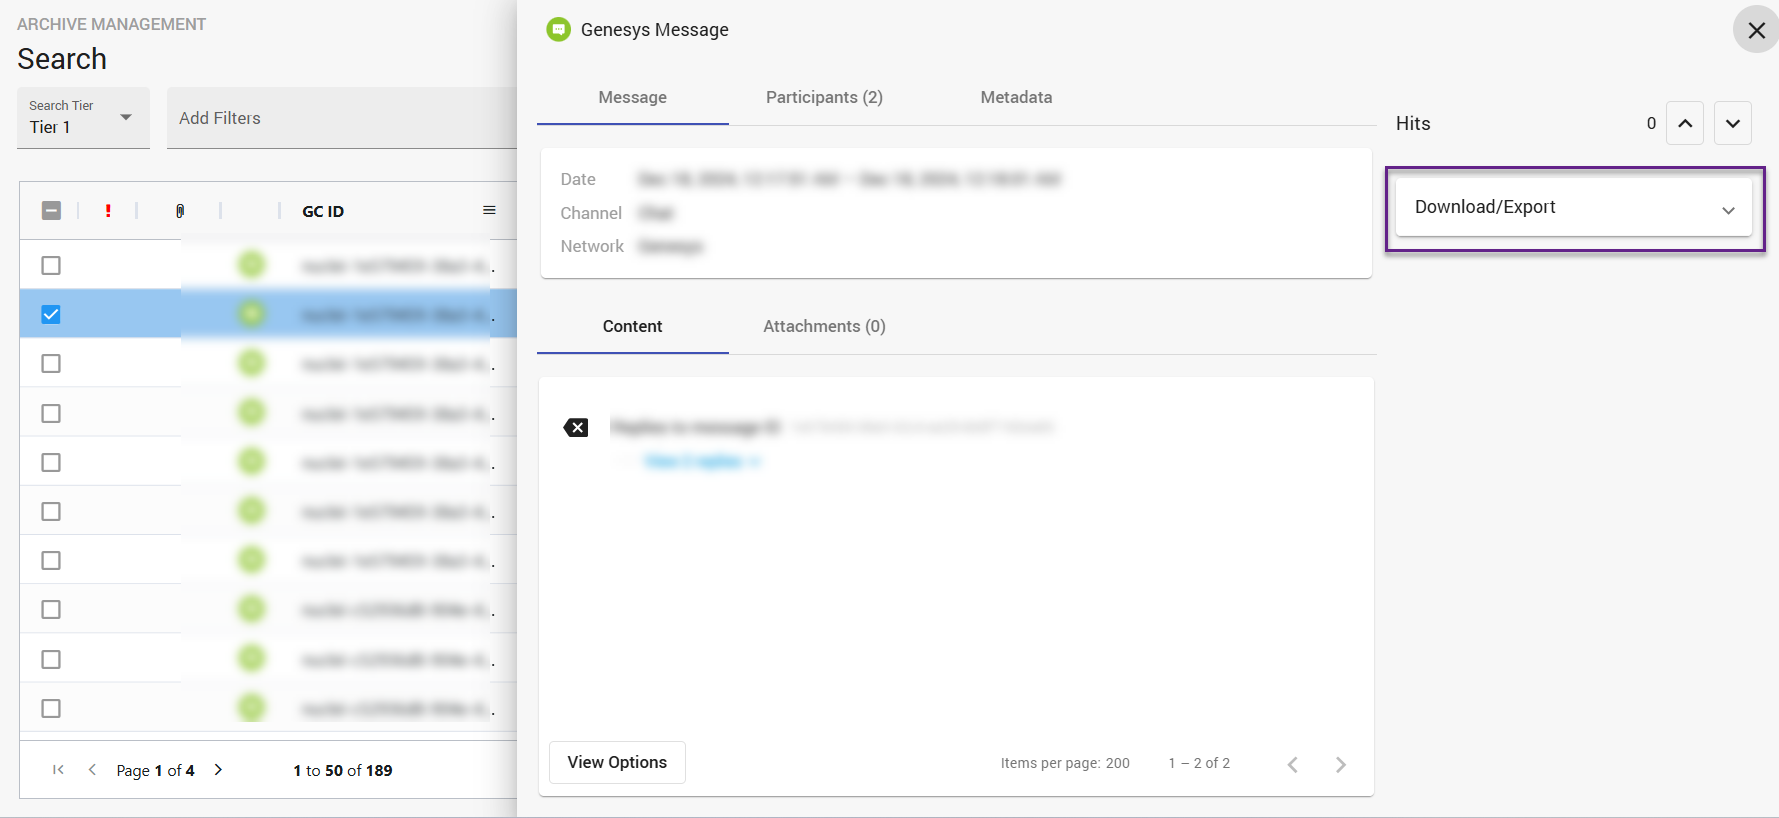
Specify a name for the file to be exported in the Name text box.
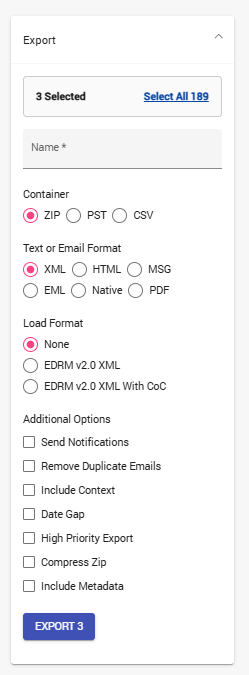
You cannot export more than 1 million documents at once. The following message is displayed if more than 1 million documents are exported:
“No. of documents selected for exports is greater than 1 million docs, please refine the export criteria and try again.“
Choose a Container type - ZIP, PST or CSV. The exported documents will be downloaded on the chosen type.
Choose a desired Text or Email Format:
XML
HTML
MSG
EML
Native
PDF (This is controlled by a feature flag and is available only to certain customers for evaluation purposes. Contact Smarsh Support to enable this feature. Also see, Limitations in PDF Export.
To export all instant messages into a single consolidated file, select the Zip option under Container, and the HTML format from Text or Email Format options. After you export, the downloaded ZIP file contains a full-snapshot-N.html file. This HTML file provides a consolidated view of all the exported messages and can be viewed in any Enterprise Archive supported web browser.
Select one of the following Load Format options:
None - To get the exported document in a simple XML or HTML format.
EDRM v2.0 XML - To get the exported document in an Electronic Discovery Reference Model (EDRM) format.
EDRM v2.0 XML With CoC - To get the exported document in an Electronic Discovery Reference Model (EDRM) format with CoC (Chain of Custody) enabled. Chain of Custody guarantees Enterprise Archive users data authenticity and ensures the data has not been tampered with from the time it has been ingested until the final download.
Select one of the following Additional Options:
Send Notifications -Enables email notifications to be sent when the export jobs have completed.
Remove Duplicate Emails - Eliminates near-duplicate email messages from the final export package. Near-duplicate emails are email messages that are identical except for minor differences in the email headers. For more information, see What happens when "Remove Duplicate Emails" is enabled?
Include Context - All messages from the same conversation thread (with the same GCID) are exported as a single file. Contact your Smarsh representative to enable this feature and configure the network to include context.
Compress Zip - Compresses the final packed zip file.
Include Expanded Participants -Includes the complete list of participants in a communication.
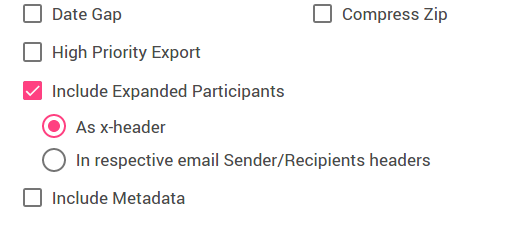
You can choose between the following options:
As x-header - Includes all DL and participants information within the interaction, which can be viewed as internal headers. That is additional x-headers such as X-ACTIANCE-RECIPIENTS and X-ACTIANCE-SNAPSHOT-ID containing all the participants in the communication including the ones expanded from Distribution Lists and BCC. This option is selected by default.
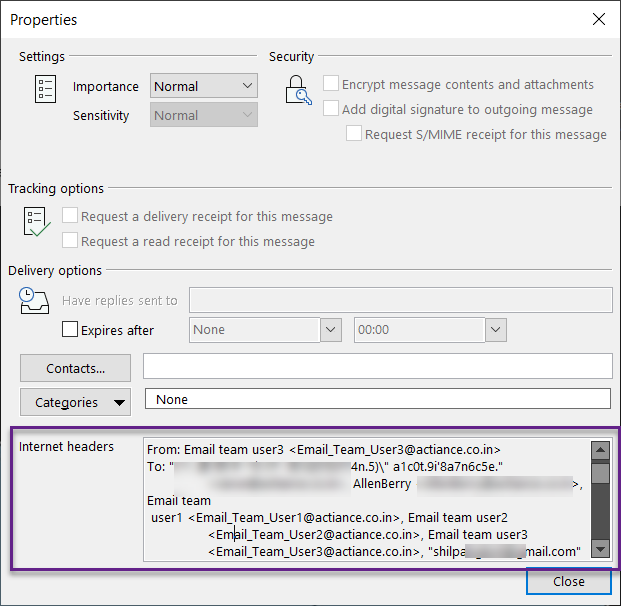
In respective email Sender/Receipients headers - Includes all participant information inline. That is, the DL and participants information are available in the respective To, Cc, Bcc, or From fields in the exported interaction.
DLs without Participants Expansion

DLs with Participants Expansion
Include Metadata - Enabling this check-box will include communication metadata. This is not available for Native and PDF export formats.
Date Gap - Enabling this check-box generates a report containing the total number of items found per day in a date range specified per communication.
High Priority Export - Enabling this check-box ensures the selected documents will be prioritized for export above any other documents in queue.
Click Export [Number],where [Number] dynamically reflects the count of selected communications. A confirmation dialog appears once the export is completed.
Exporting Communication Metadata
To export only communication metadata from the search results:
Select all communications or only specific communications from the search results, and then select Export Selected As CSV or Export All As CSV.
Specify a name for the file to be exported in the Name text box.
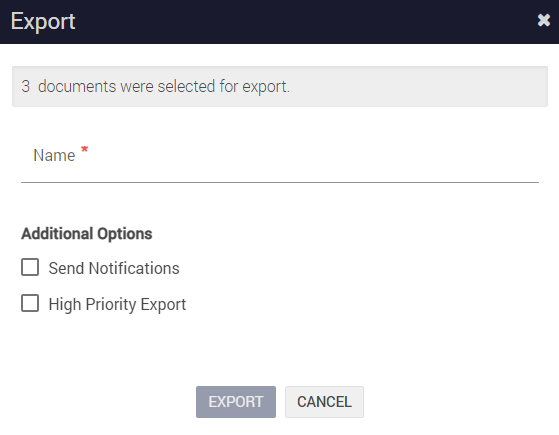
Choose the following options under Additional Options:
Send Notifications - Enables email notifications to be sent when the export jobs have completed.
High Priority Export - Ensures the selected documents will be prioritized for export above any other documents in queue.
Click Export. A confirmation dialog appears once the export is completed.
Scheduling Exports based on Search Criteria
Scheduled Exports allows users to save their search criteria, and create a scheduler to export the saved search results at desired intervals. Scheduled Exports also allows users to specify a location of their choice, and select the desired format for the exported documents.
You can setup Scheduled Exports from the Case Management workspace as described in the following procedure. Clicking Scheduled Exports under the Case Management tab will display the following screen.
Important
For information about the Failover/Failback Mitigation plan for Scheduled Exports along with the limitations, see the FAQs section .
Figure 3: Scheduled Exports Workspace

The following actions can be performed from the Scheduled Exports workspace:
|
Action |
Description |
|
Add a Scheduled Export |
Click Add a Scheduled Export to setup a scheduled export. |
|
|
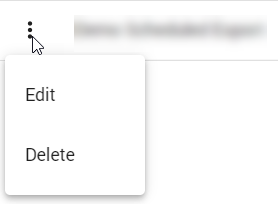
Click the vertical ellipse to either Edit or Delete an existing scheduled export. |
|
|
The switch interface enables you to either enable or disable an existing scheduled export. Note that once a scheduled export is created, it will be enabled by default. |
Adding a Scheduled Export
More than 1 million documents cannot be exported per Scheduled Export. If a scheduled export contains more than 1 million documents, a pop-up message stating “No. of documents selected for exports is greater than 1 million docs, please refine the export criteria and try again.“ is displayed.
If more than 1 million documents are identified:
You will not be able to create a new Scheduled Export.
Enterprise Archive skips the date range and proceeds to the next Scheduled Export, before triggering a Scheduled Export. Exports skipped will show as Skipped in the Exports listing page.
A failure email notification is triggered to the creator of the Scheduled Export, in an ongoing Scheduled Export.
This behavior is implemented to prevent outages caused due to large number of exports.
To add a scheduled export:
Click Scheduled Exports under the Archive/Case Management workspace, and click Add a Scheduled Export. The following screen is displayed.
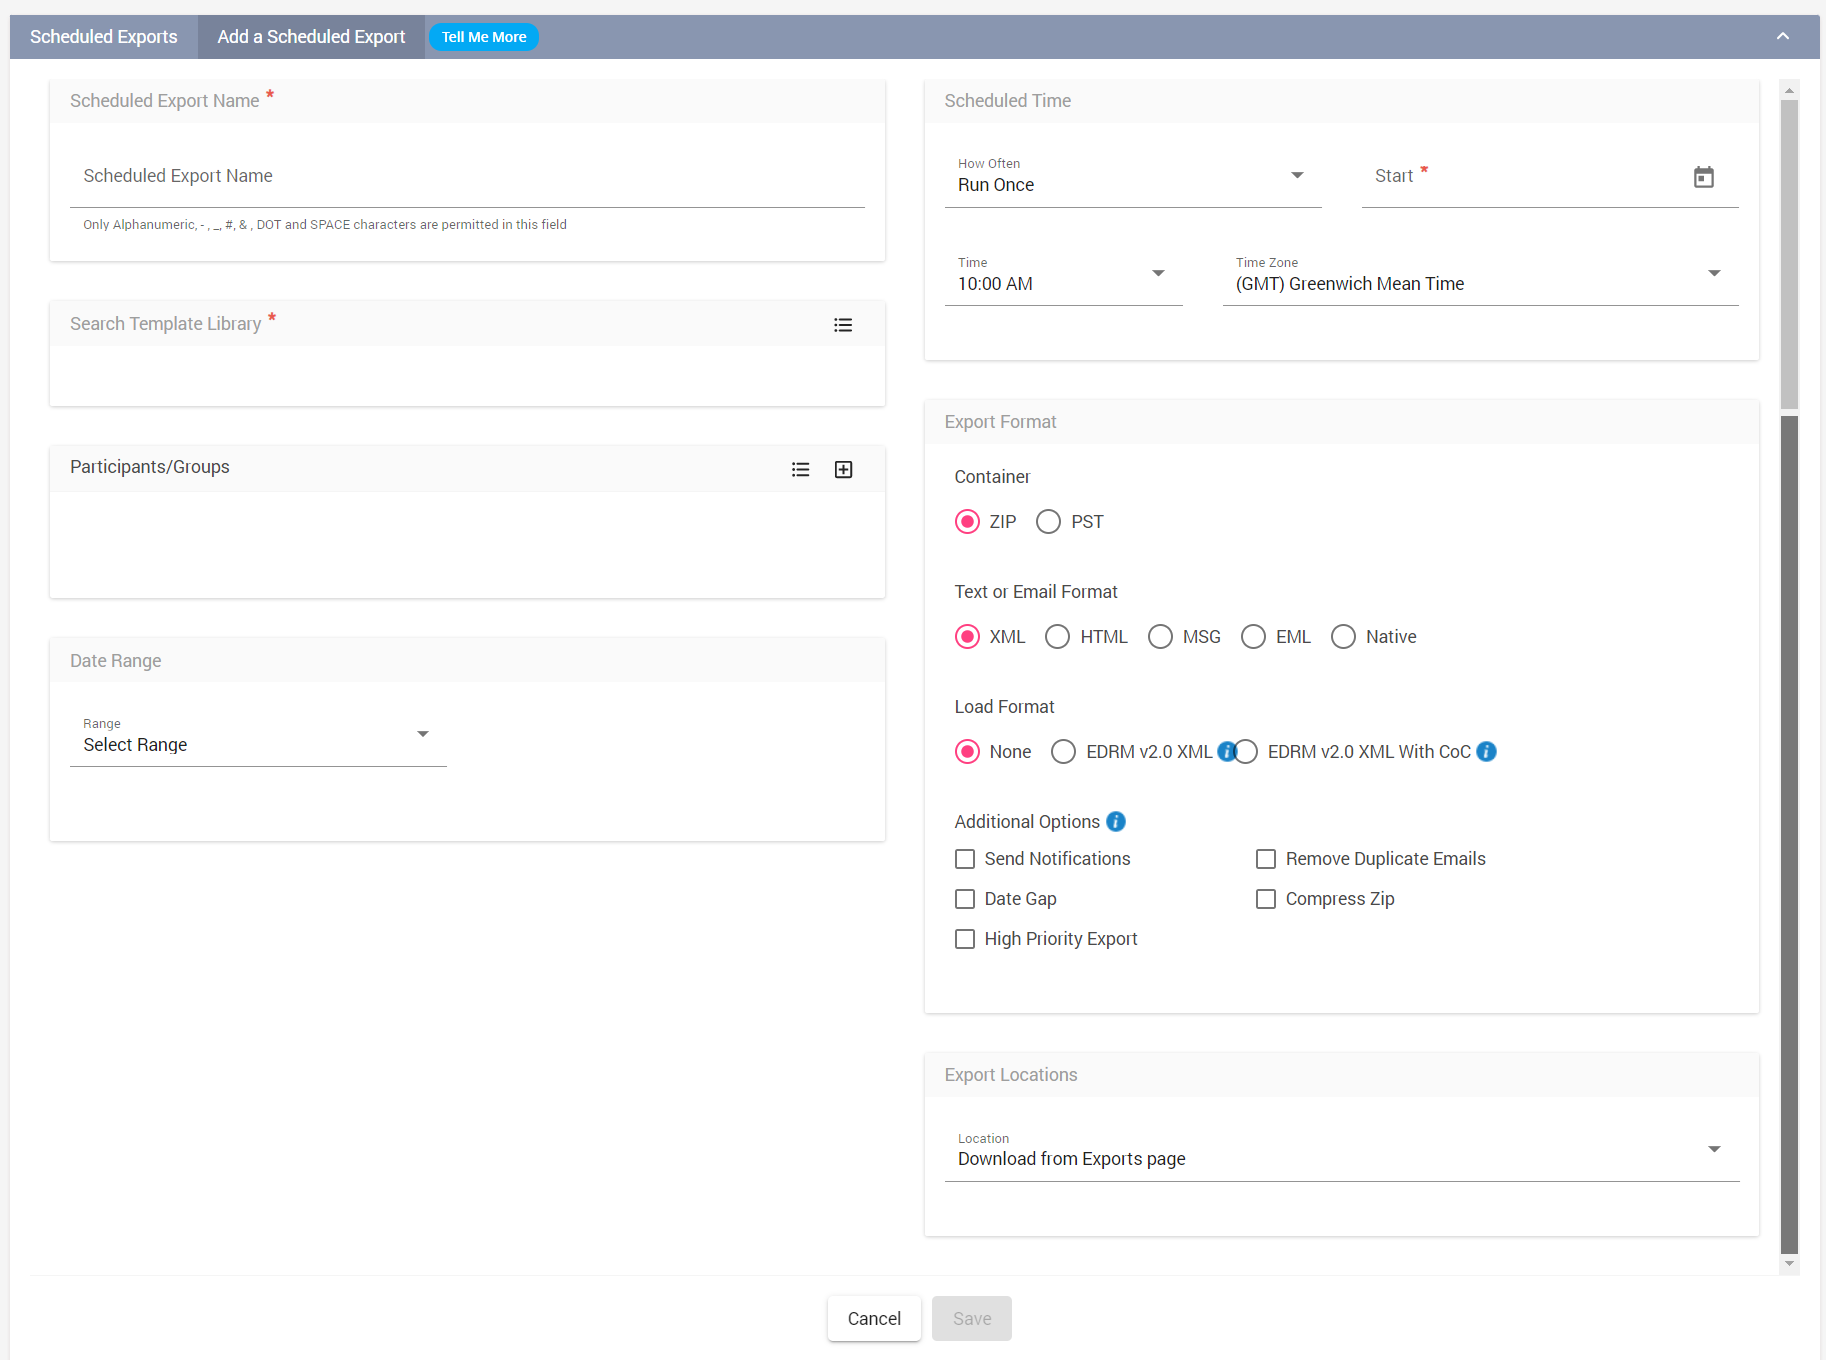
Enter a valid name in the Scheduled Export Name field.
Click the (
 ) icon to select a Search Template Library. A Search Template is created when the saved search criteria is published from the Archive Management Search workspace.
Similarly, a search template is created in Case Management workspace when the saved search criteria is published from the Case Management Search workspace.
Select the desired template and click Add.Apply the added Search Template to specific participants/participant groups by clicking the select (
 )/add (
  ) against the Participants/Groups option. The Search Template will apply only to the participants/participant groups that have been added, and will not include the participants/participant groups who were part of the Search Template.
The user can further filter the search results by selecting one of the following options:
Any of these - Selecting this option will display search results containing any of the selected Participants/Groups.
All of these - Selecting this option will display search results containing all the selected participants/Groups.
Selecting Internal Participants
Click the
 icon next to Participants/Groups. The Select Participants screen appears.
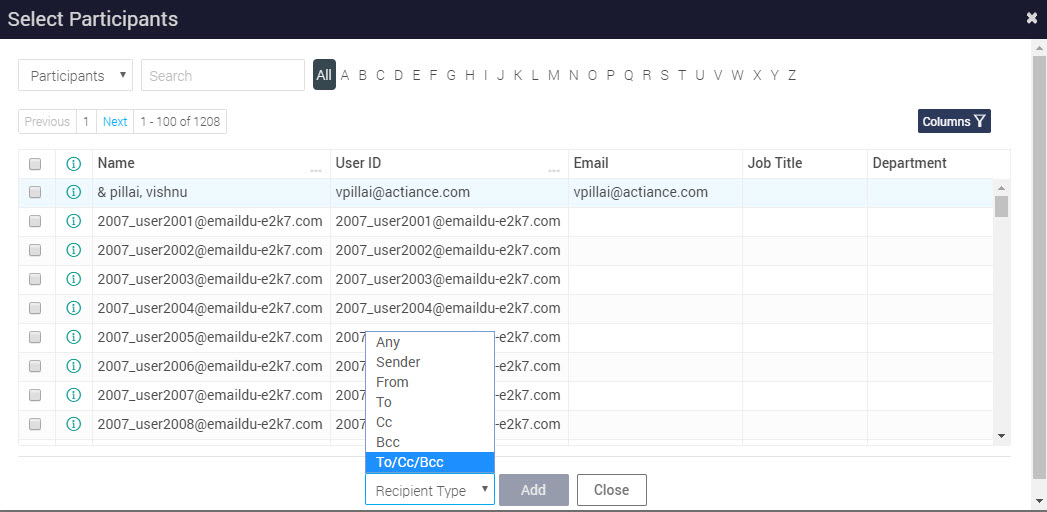
Select the participant(s) and/or group(s) you are interested in and click Add.
You can also filter the Participants/Groups by clicking the Recipient Type button next to the Add button, and selecting from the following options:
Any - Selecting this option will filter the participants/groups who are part of any of the distribution lists such as From, To, CC, and BCC.
From - Selecting this option will filter the participants/groups who are part of the From distribution list only.
To - Selecting this option will filter the participants/groups who are part of the To distribution list only.
Cc - Selecting this option will filter the participants/groups who are part of the Cc distribution list only.
Bcc - Selecting this option will filter the participants/groups who are part of the Bcc distribution list only.
To/Cc/Bcc - Selecting this option will filter the participants who are part of the To, Cc, and Bcc distribution lists.
Click Close to exit the dialog.
Adding Internal, External, Public, or Federated Participants
Click the
 icon to add external participants/groups. The Add Participants/Groups text-box appears with two panes.
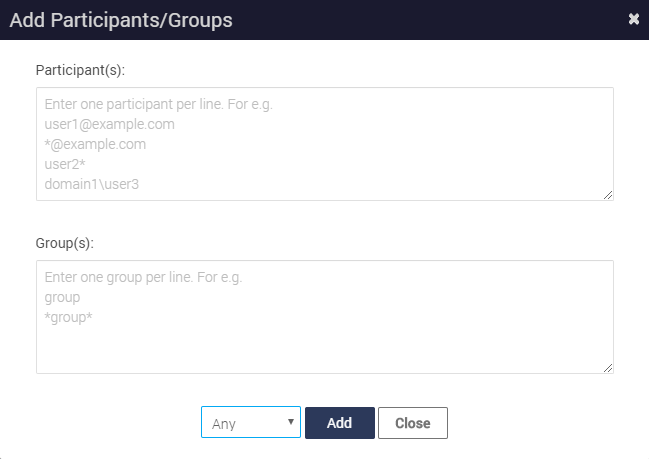
Enter the external or public participant's network display name or their Network Endpoint ID. One line per participant (the top pane) and/or name of the group (the bottom pane)
Click Add. To add more public participants, enter their respective Network Display Names or Network Endpoint ID, and then click Add.
You can also filter the Participants/Groups by clicking the Recipient Type button next to the Add button, and selecting from the following options:
Any - Selecting this option will filter the participants/groups who are part of any of the distribution lists such as From, To, CC, and BCC.
From - Selecting this option will filter the participants/groups who are part of the From distribution list only.
To - Selecting this option will filter the participants/groups who are part of the To distribution list only.
Cc - Selecting this option will filter the participants/groups who are part of the Cc distribution list only.
Bcc - Selecting this option will filter the participants/groups who are part of the Bcc distribution list only.
To/Cc/Bcc - Selecting this option will filter the participants who are part of the To, Cc, and Bcc distribution lists.
Once you have completed adding participants, click Close.
Select a Date Range from the list of options provided to further filter the search results, as shown in the following screen.
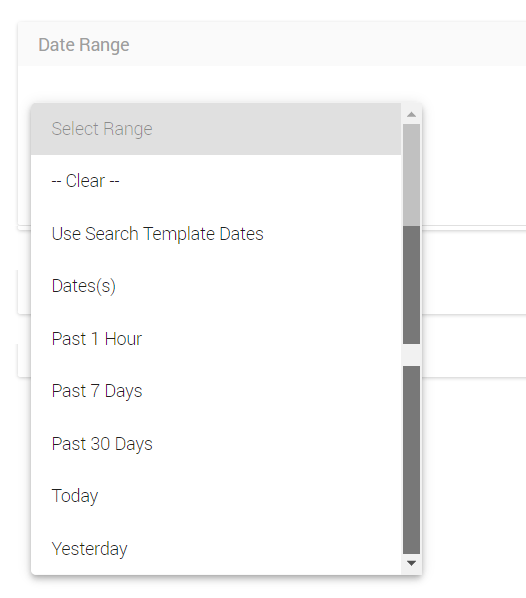
The available options are:Use Search Template Dates: Select this option to retain the date range present in the Search Template.
Date(s): Select this option to specify a date range and further filtering based on the following types of data:
Archived: The date/time when the interaction was received in Enterprise Archive.
Sent: The actual send date/time specified in the interaction.
Past 1 Hour: Select this option to filter search results for a one-hour time period.
Past 7 Days: Select this option to filter search results for a seven-day time period.
Past 30 Days: Select this option to filter search results for a 30-day time period.
Today: Select this option to filter search results for the same day that the Scheduled Export task is configured.
Yesterday: Select this option to filter search results for the previous day from when the Scheduled Export task is configured.
Select a Scheduled Time from the options provided which will determine the frequency of the Scheduled Exports task, as shown in the following screen:
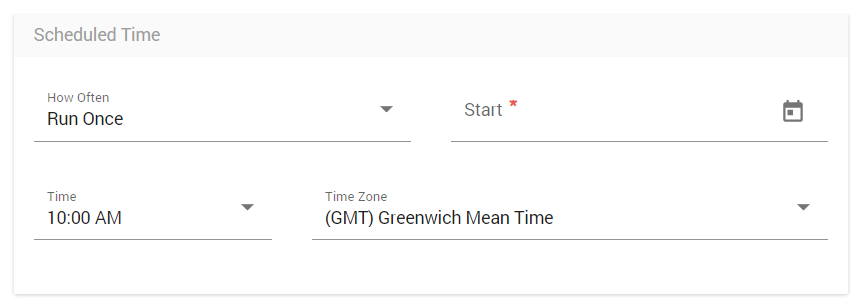
The available options are:Run Once: Select this option to run the Scheduled Export task once only, by specifying a Start Date/Time.
Run Frequently: Select this option to run the Scheduled Export task at a set Recurrence, and by specifying a Start Date/Time. The available options are:
Hourly
Daily
Weekly
Run Now: Select this option to run the Scheduled Export task immediately.
Time Zone: Select the desired time zone from the list of time zones provided. The Time Zone field is applicable only to the Run Once and Run Frequently options.
Select a document format to export the conversations from Text or Email Format. The available document formats are:
XML
HTML
MSG
EML
Native
To export all instant messages into a single consolidated file, select the Zip option under Container, and the HTML format from Text or Email Format options. After you export, the downloaded ZIP file contains a full-snapshot-N.html file. This HTML file provides a consolidated view of all the exported messages and can be viewed in any Enterprise Archive supported web browser.
Select one of the following Load Format options:
None - To get the exported document in a simple XML or HTML format.
EDRM v2.0 XML - To get the exported document in an Electronic Discovery Reference Model (EDRM) format.
EDRM v2.0 XML With CoC - To get the exported document in an Electronic Discovery Reference Model (EDRM) format with CoC (Chain of Custody) enabled. Chain of Custody guarantees Enterprise Archive users data authenticity and ensures the data has not been tampered with from the time it has been ingested until the final download.
Select one of the following Additional Options:
Send Notifications - Enabling this check-box enables email notification to be sent when the export jobs have completed.
Remove Duplicates - Enabling this check-box eliminates duplicate conversations from the final export package. Duplicate emails are email conversations that are similar except for minor differences such as header information and so on.
Currently, De-duplication is supported only for email data.
De-duplication will be done based on the fields configured by the Operations team for a specific Enterprise Archive tenant.
The dedup.csv summaries the email messages ingested containing identical messages but with minor differences in the header or body along with the respective snapshot IDs. Whenever the user selects Remove Duplicate Emails in an export request, multiple emails having the same Body, Attachments, and so on will be suppressed in the exports. As a result only one email having the same parameters will be included in the export.
The typical fields that are configured include Subject, Body, Attachments, Sender/Recipients, and Date/Time stamp. Fields can be added or removed based on your requirement by configuring a server property. The permitted values for configuration are Body, Attachments, To, From, Sender, Subject, Cc, Bcc, Date, or any other subsets of these values.
The summary.txt file will have the high level details of suppressed documents such as dedup count, whether dedup was enabled or not and the value of the property during the export.
Compress Zip - Enabling this check-box will compress the final packed zip file.
Date Gap - Enabling this check-box generates a report containing the total number of items found per day in a date range specified per conversation.
High Priority Export - Enabling this check-box ensures the selected documents will be prioritized for export above any other documents in queue.
Include Expanded Participants -Includes the complete list of participants in a communication.

You can choose between the following options:
As x-header - Includes all DL and participants information within the interaction, which can be viewed as internal headers. That is additional x-headers such as X-ACTIANCE-RECIPIENTS and X-ACTIANCE-SNAPSHOT-ID containing all the participants in the communication including the ones expanded from Distribution Lists and BCC. This option is selected by default.

In respective email Sender/Receipients headers - Includes all participant information inline. That is, the DL and participants information are available in the respective To, Cc, Bcc, or From fields in the exported interaction.
DLs without Participants Expansion

DLs with Participants Expansion
Include Metadata - Enabling this check-box will include communication metadata.
The final step while creating a scheduled export is to select the Export Location. The exported files can be downloaded from the selected options in the drop-down such as:
Download from Exports page - Selecting this option means the scheduled exports can be downloaded from the Exports page in Archive Management or Case Management respectively.
A list of SFTP locations that have been added in the Export Locations page, where the data is exported to unique sub-folders. The SFTP server details such as Server IP Address, Folder Name and Location Type are displayed.
For users to distinguish data for each export and also to provides the capability to segregate exports for each line of business, Enterprise Archive automatically creates sub-folders if they do not exist in the SFTP server. To automatically create sub-folders, write permissions must be granted to the account that is used to create the SFTP Export Location.
Click Save.
